This text is meant to be a basic starter information to photographing the Northern lights. The title is probably deceptive because the “Northern Lights” usually are not only a phenomenon of the Northern hemisphere but additionally happen within the Southern Hemisphere. Within the North, it’s typically known as the Aurora Borealis whereas within the south, it goes by Aurora Australis. Nonetheless, my expertise has typically been capturing the Northern Lights in Norway and Iceland, and that is what I’ll now increase upon.
1) The place to {photograph} the Northern Lights
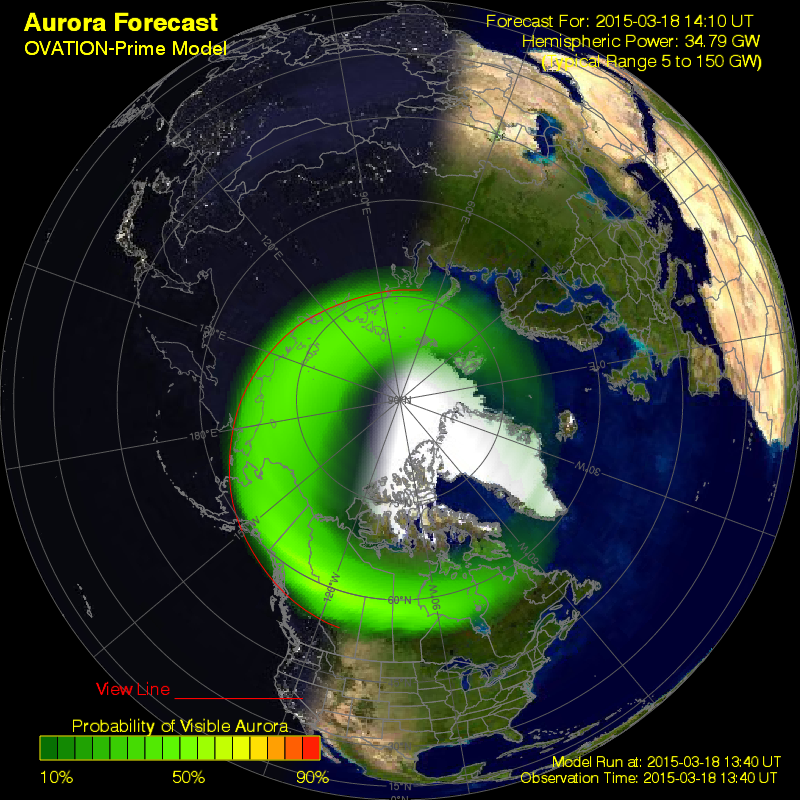
The Northern Lights are finest seen within the excessive latitude areas of the Earth, typically north of the Arctic Circle. Of late, the preferred locations to {photograph} this phenomenon have been in Iceland, Scandinavian nations like Norway, Finland and Sweden and Greenland. As you may see within the above picture which is downloaded from www.spaceweather.com, you may see the aurora oval (as of March 18, 2015) within the Northern Hemisphere – on this picture, components of northern Canada and the northernmost fringes of Scandinavia and Russia appear to have the very best show.
My very own experiences have been photographing these in Iceland in addition to within the Lofoten Islands of northern Norway though Greenland has additionally turn out to be in style lately and there are many photograph excursions geared towards Northern Lights pictures to all these locations.
2) When to {photograph} the Northern Lights
The Northern Lights are sometimes seen year-round; nevertheless, as is apparent, they’ll solely be seen or photographed when the sky is comparatively darkish. Due to the unbelievable fluctuation of day-night lengths within the Arctic latitudes, the interval coming into fall (round mid-September) while you start to once-again have 10-12 hour nights and longer till early spring (early March) are the very best durations to {photograph} this phenomenon.
Clearly, these durations might be fairly chilly so excessive up North so the whole course of might be fairly difficult often. The climate may run amok however that is the enjoyable of it – the problem and the wait might be fairly rewarding.
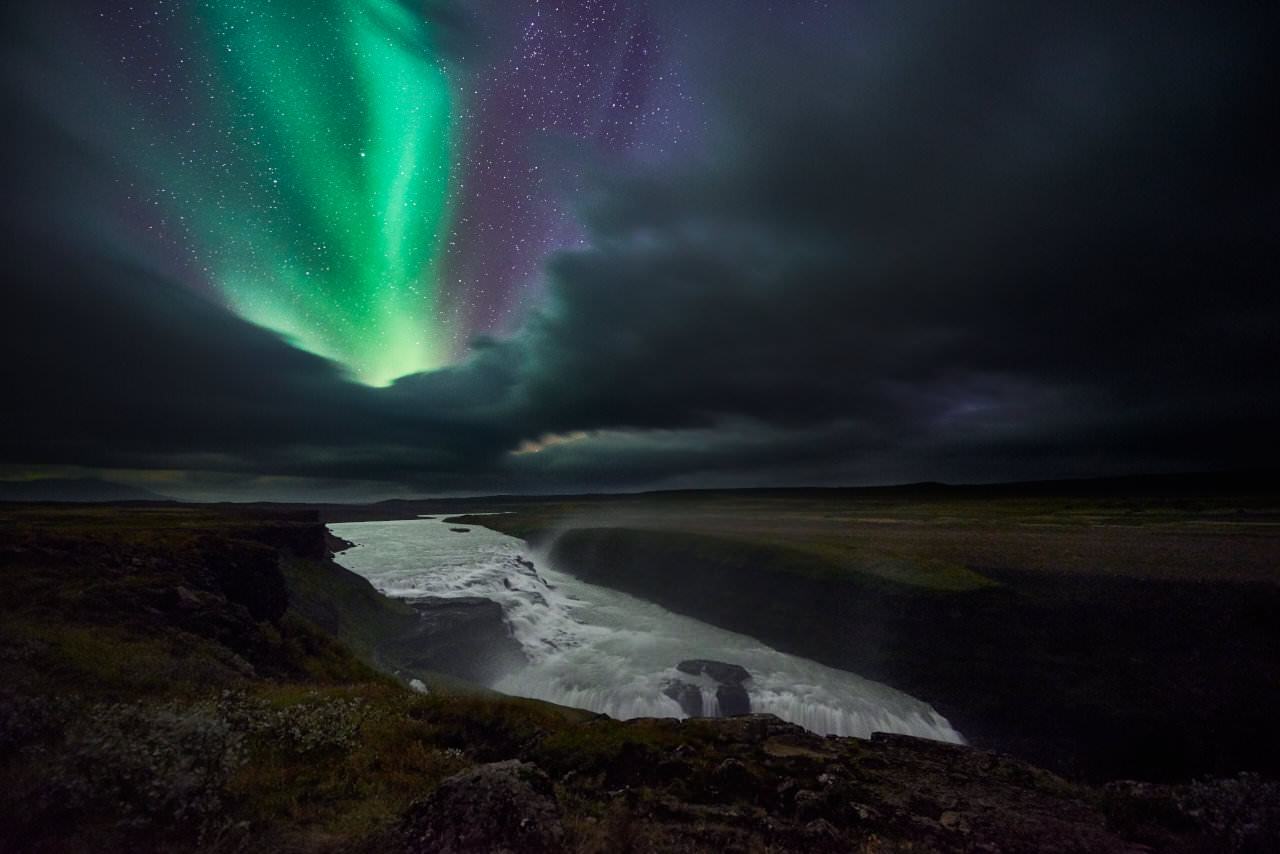
However talking of the climate, it is extremely essential to all the time hold an out for it. Oftentimes, the aurora predictions are excessive however cloud cowl can spoil the enjoyable and stop you from seeing any of it. The image under is of the well-known Gulfoss waterfall in Iceland. As you may see, I caught a glimpse of the aurora by way of the thick cloud cowl. The cloud motion was fairly swift and throughout the subsequent 10-Quarter-hour or so, there wasn’t a lot capturing left to do. Nonetheless I used to be fairly happy with this photograph and I really feel the cloud cowl helps create a dramatic visible opening and enhances the type of the waterfall fairly properly. A transparent sky could have resulted in a really typical picture and the aurora exercise wasn’t actually that sturdy that night. This simply goes to point out how even the negatives can typically be fairly useful in case you are in the appropriate place on the proper time.
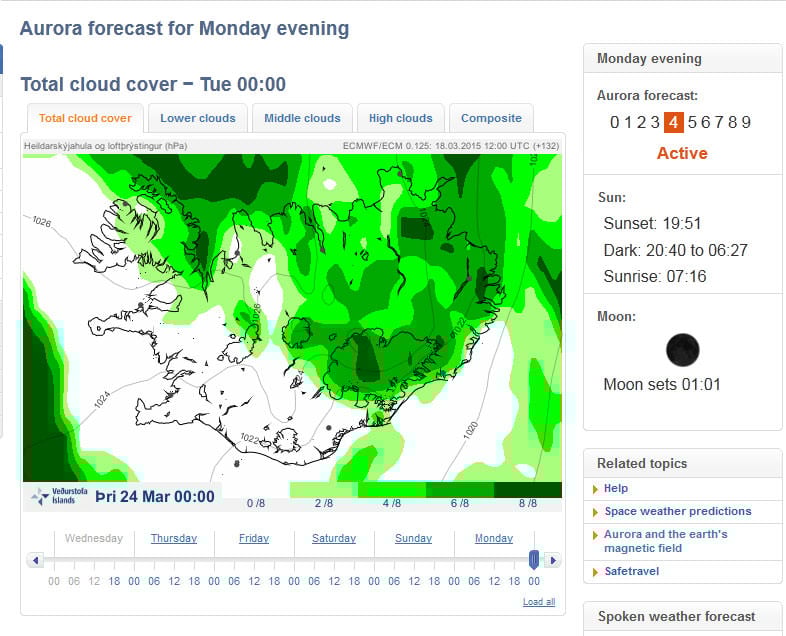
However the above picture is the exception to the rule. Cloud cowl can invariably threaten night time’s pictures and even with excessive aurora exercise, typically you want only a little bit of luck to have the ability to view it in any respect. It’s useful to notice just a few on-line web sites can be utilized to offer you a tough forecast for Aurora exercise and common climate. In Iceland for instance, the nationwide meteorological workplace http://en.vedur.is/climate/forecasts/aurora/ is an efficient supply. The web site not solely exhibits you the cloud cowl throughout Iceland (inexperienced is heavy cloud cowl, white is evident), it additionally exhibits you the dimensions of Aurora exercise on any given day. A scale of 1-2 is sort of gentle and you may even see some hazy motion throughout the sky. 3 is reasonable however 4 onwards represents various exercise and you’ll see it fairly clearly with the bare eye. Extremely, this previous St Patrick’s day photo voltaic storm created auroral exercise of the magnitude of virtually 9. The exercise was so off the charts that it was supposedly seen even down right here in New York, albeit fairly faint. I used to be fairly jealous of some photographers I observe on fb who have been posting probably the most insane aurora images I had ever seen in Iceland.
The above is a screengrab from vedur.is exhibiting the aurora forecast.
Aside from the Icelandic met workplace, just a few different good sources to test aurora forecasts are:
– http://www.yr.no (Norwegian met workplace)
– http://kho.unis.no
– http://www.spaceweather.com
3) The best way to {photograph} the Northern lights
And now we come to the meat of the matter. How can we {photograph} this? The necessities are fairly easy – quick wide-angle lens, a DSLR/mirrorless digicam able to good high-ISO high quality and sturdy tripod.
3.1) Digicam
Most fashionable digital cameras have gotten fairly able to capturing comparatively clear photos at ISOs of 1600 and above. Typically, cameras with full-frame sensors will provide you with the highest quality at excessive ISOs, although the newest breed of smaller sensor cameras aren’t any slouches both. I’ve shot a whole lot of auroras with my older Nikon D800 at ISO 3200, and if uncovered accurately, the pictures are fairly clear to my style. Newer generations just like the D850 and Z8 solely enhance upon that efficiency.
Lens alternative can be drastically impacted by kind of digicam used for the reason that similar lens on a crop-factor sensor is not going to be as large as on a full body digicam.
3.2) Lens
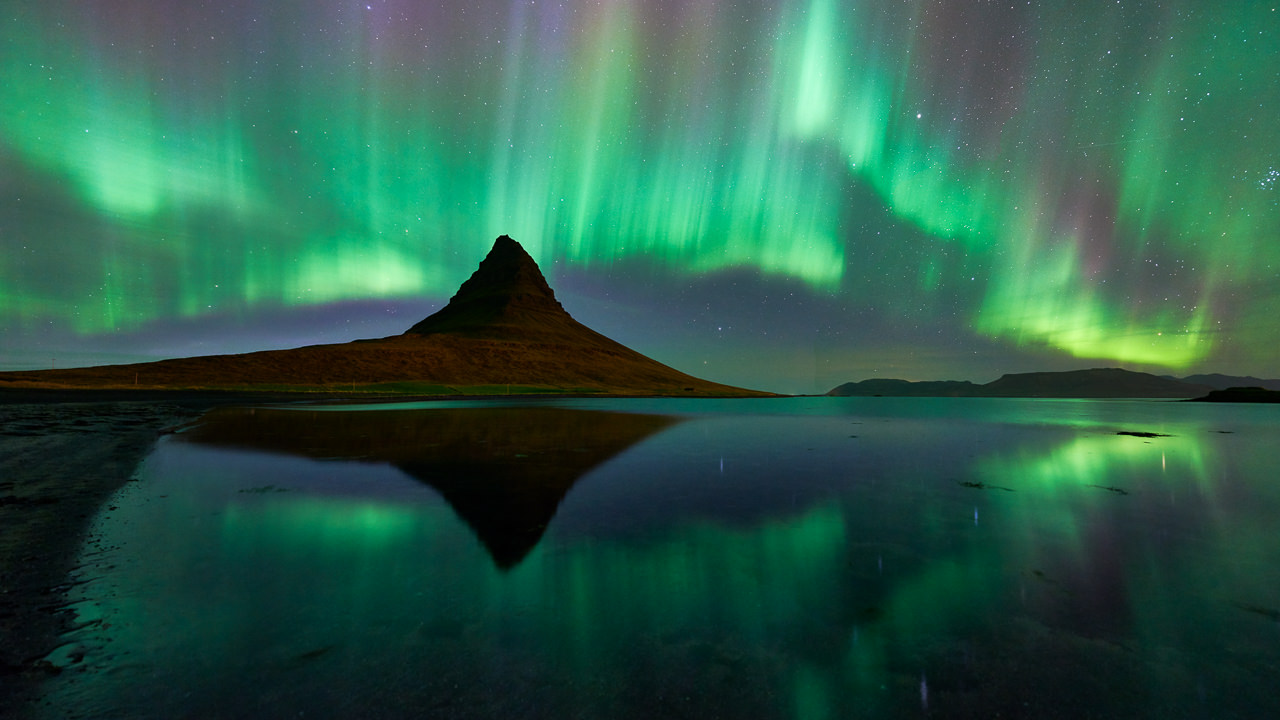
Talking of lenses, any quick lens is usable, however typically, the broader angle lenses are finest as they offer you adequate “attain” into the sky to seize as a lot of the exercise as potential. Within the two photos under, the photograph on the left was shot with the Zeiss 21mm f/2.8 lens whereas the one on the appropriate was shot with my Nikon 14-24mm f/2.8 at 14mm. What the 14mm focal size allowed me to do this night time was to have the ability to body the whole mountain and it’s reflection with sufficient of the sky to observe the aurora.
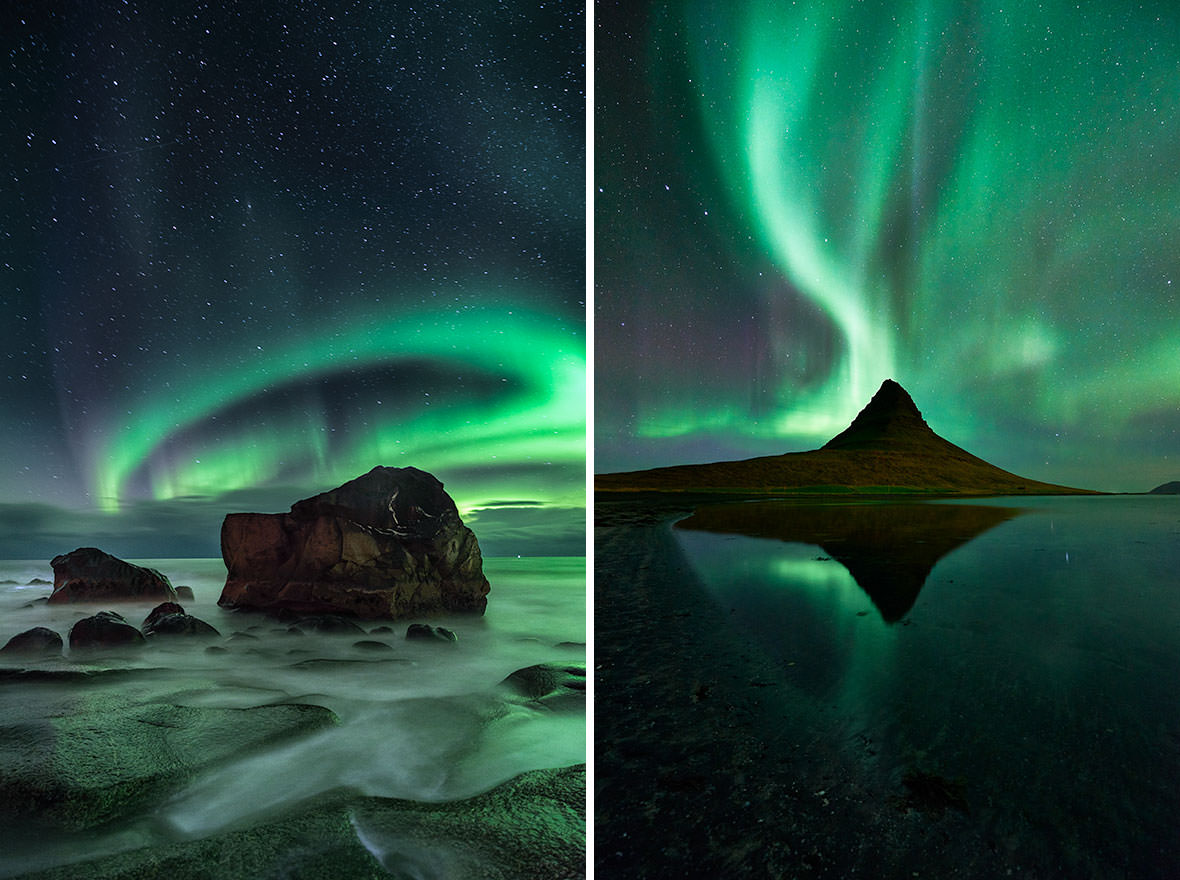
Having the 14mm to 24mm vary additionally permits some flexibility in framing which the prime doesn’t. That mentioned, there are different quick primes round, such because the Nikon 20mm f/1.8. These provide the benefit of 1-2 stops of additional gentle, that means you may both cut back your ISO (for larger dynamic vary) or cut back your shutter to get extra element in your publicity.
A few of you might fear that the quick lenses would possibly lead to shallow depth of discipline. However generally, to {photograph} one thing so distant within the sky, you’ll be focusing at infinity anyway. Until you might be additionally together with a foreground object in your composition, it is best to typically haven’t any worries apart from the noise from the upper ISOs.
One tough side of an autofocus lens is that it may be fairly troublesome to focus in a close to pitch black setting. My handbook focus Zeiss prime is unbelievable since all I must do is to show the main focus ring all the way in which to the top, and it’s at infinity. With an autofocus lens, the trick right here is to pre-focus on one thing far within the distance, then swap your lens to handbook focus and don’t contact it once more. Some photographers even repair their lens focus ring to infinity utilizing duct tape. The opposite choice is to ask a companion to face distant, then use their telephone as a shiny supply to give attention to. With a really large angle lens such because the 14-24mm, a distance of about 20-30 ft ought to offer you fairly near infinity focus.
Aurora motion can differ – typically it dances slowly throughout the sky; typically it’s fairly quick and energetic and breathtakingly stunning. A really lengthy publicity will lead to “smearing” of auroral exercise so the shorter the publicity time, the higher.
3.3) Tripod
A tripod is a should, however any semi-serious photographer most likely has one already. On this case although, there are most likely just a few particulars to take heed to as a precaution.
Most of us journey nice distances to witness and {photograph} the Northern Lights. So it’s crucial to pack your gear in a manner that’s straightforward to be carried round. Relating to tripods, it’s typically a given {that a} stable carbon fiber tripod will likely be funding in the long term. The climate in such areas might be fairly finicky so in case your tripod is simply too gentle, you might get blurry images as a consequence of sturdy winds. Induro and Sirui have some good reasonably priced tripods whereas on the upper finish, Gitzo and RRS have sturdy tripods that be prolonged fairly tall if vital.
Tripod care is a should too. In extraordinarily chilly temperatures, some carbon fiber supplies would possibly get stiff and brittle; so excellent care is critical so that you don’t snap a leg whereas folding it again collectively. Additionally if a number of of your tripod legs is submerged below (sea) water whereas capturing, it’s typically a good suggestion to wash the legs as quickly as potential to forestall accumulation of saline matter.
3.4) Approach
The fundamentals are fairly easy. As a starter rule, open your lens to its widest aperture, set your ISO to about 1600, and shoot an publicity of 10-15 seconds. Aurora exercise – even shiny exercise – continues to be fairly darkish to the digicam sensor; so even at excessive ISO, you want a comparatively lengthy publicity of about 10-15 seconds. Most of my aurora photographs have been with lenses with a most aperture of f/2.8. With a lens such because the 24mm 1.4, you can get a 2-stop benefit and both shoot at a decrease ISO to get cleaner recordsdata with larger dynamic vary; or shoot a shorter publicity so you will get much more element and stop long-exposure “smearing”.
The final concept is to shoot so that you’ve got a effectively uncovered histogram. When you shoot your first check publicity, it is best to get a good suggestion if it’s too shiny or too darkish and compensate accordingly. Typically the sunshine from the aurora comes by way of fairly properly however any foreground panorama will likely be a lot darker. If not uncovered correctly, the shadow element will likely be very arduous to get better. Some photographers typically shoot the aurora at their optimum settings, then later seize a for much longer publicity to get the utmost element within the foreground. Occasionally when you could have a foreground object equivalent to a rock very near digicam, some photographers even shoot a number of images at various focal distances after which focus stack the lead to photoshop.
In fact, it’s fairly troublesome to compose an image at the hours of darkness. My private trick is to spice up the ISO to the max so I can take a short 2-3 second shot and perceive what I’m framing. As soon as I’m blissful, I can convey down the settings to their optimum values. Should you can degree your tripod in addition to your digicam, it is best to then have the ability to swing the digicam round as vital and {photograph} to your coronary heart’s content material.
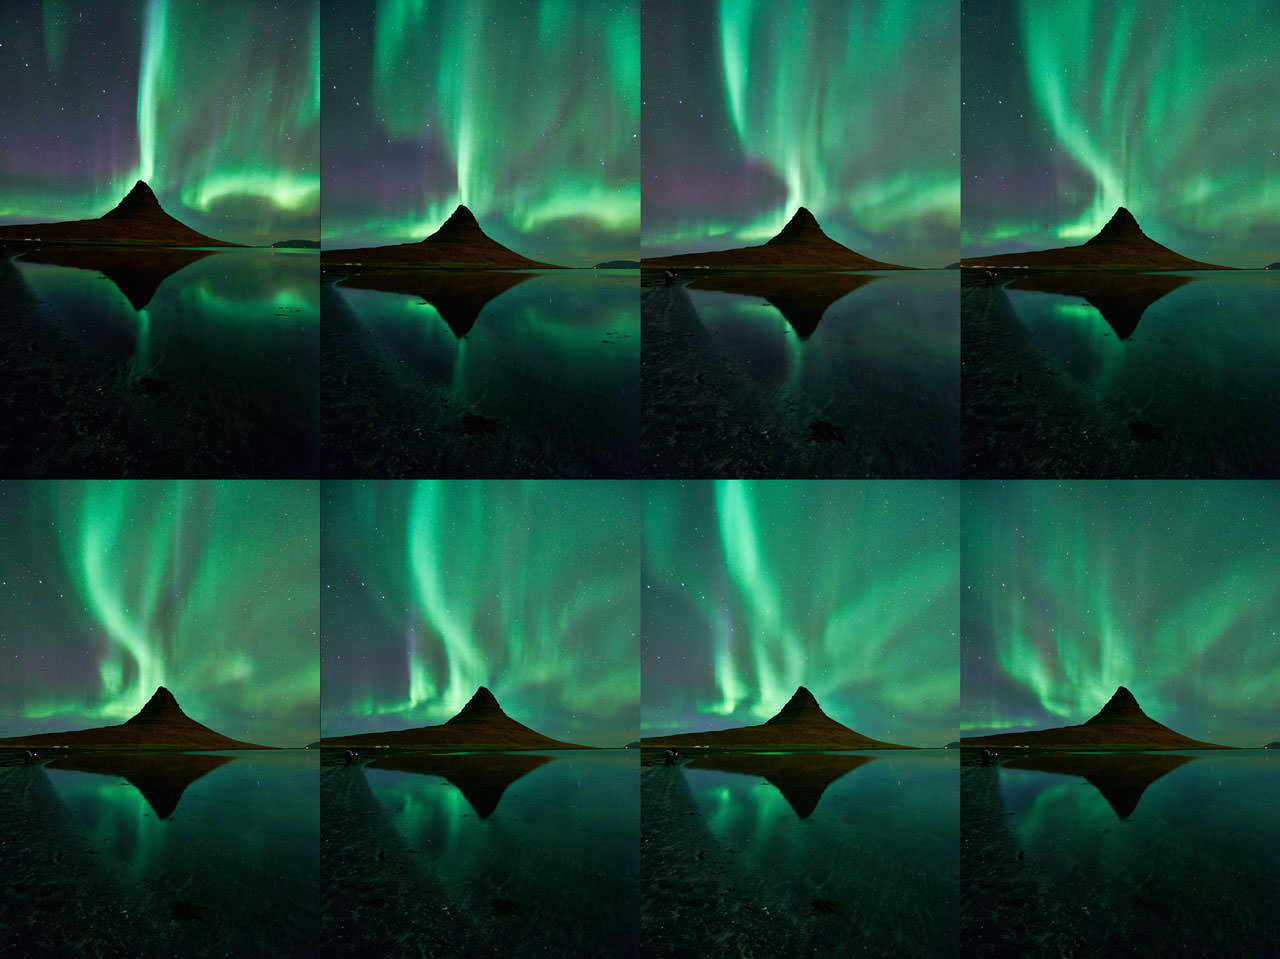
The photographs above exhibits a sequence of photos I shot within the Snæfellsnes peninsula of Iceland, trying on the beautiful Kirkjufell. This aurora show was maybe probably the most superb show I had ever seen. It was very clear and exquisite and extremely lively and went for tow hours. This transition of the Aurora waves occurred in a 4 minute interval and every body was shot for 13 seconds at ISO 2500 at 14mm.
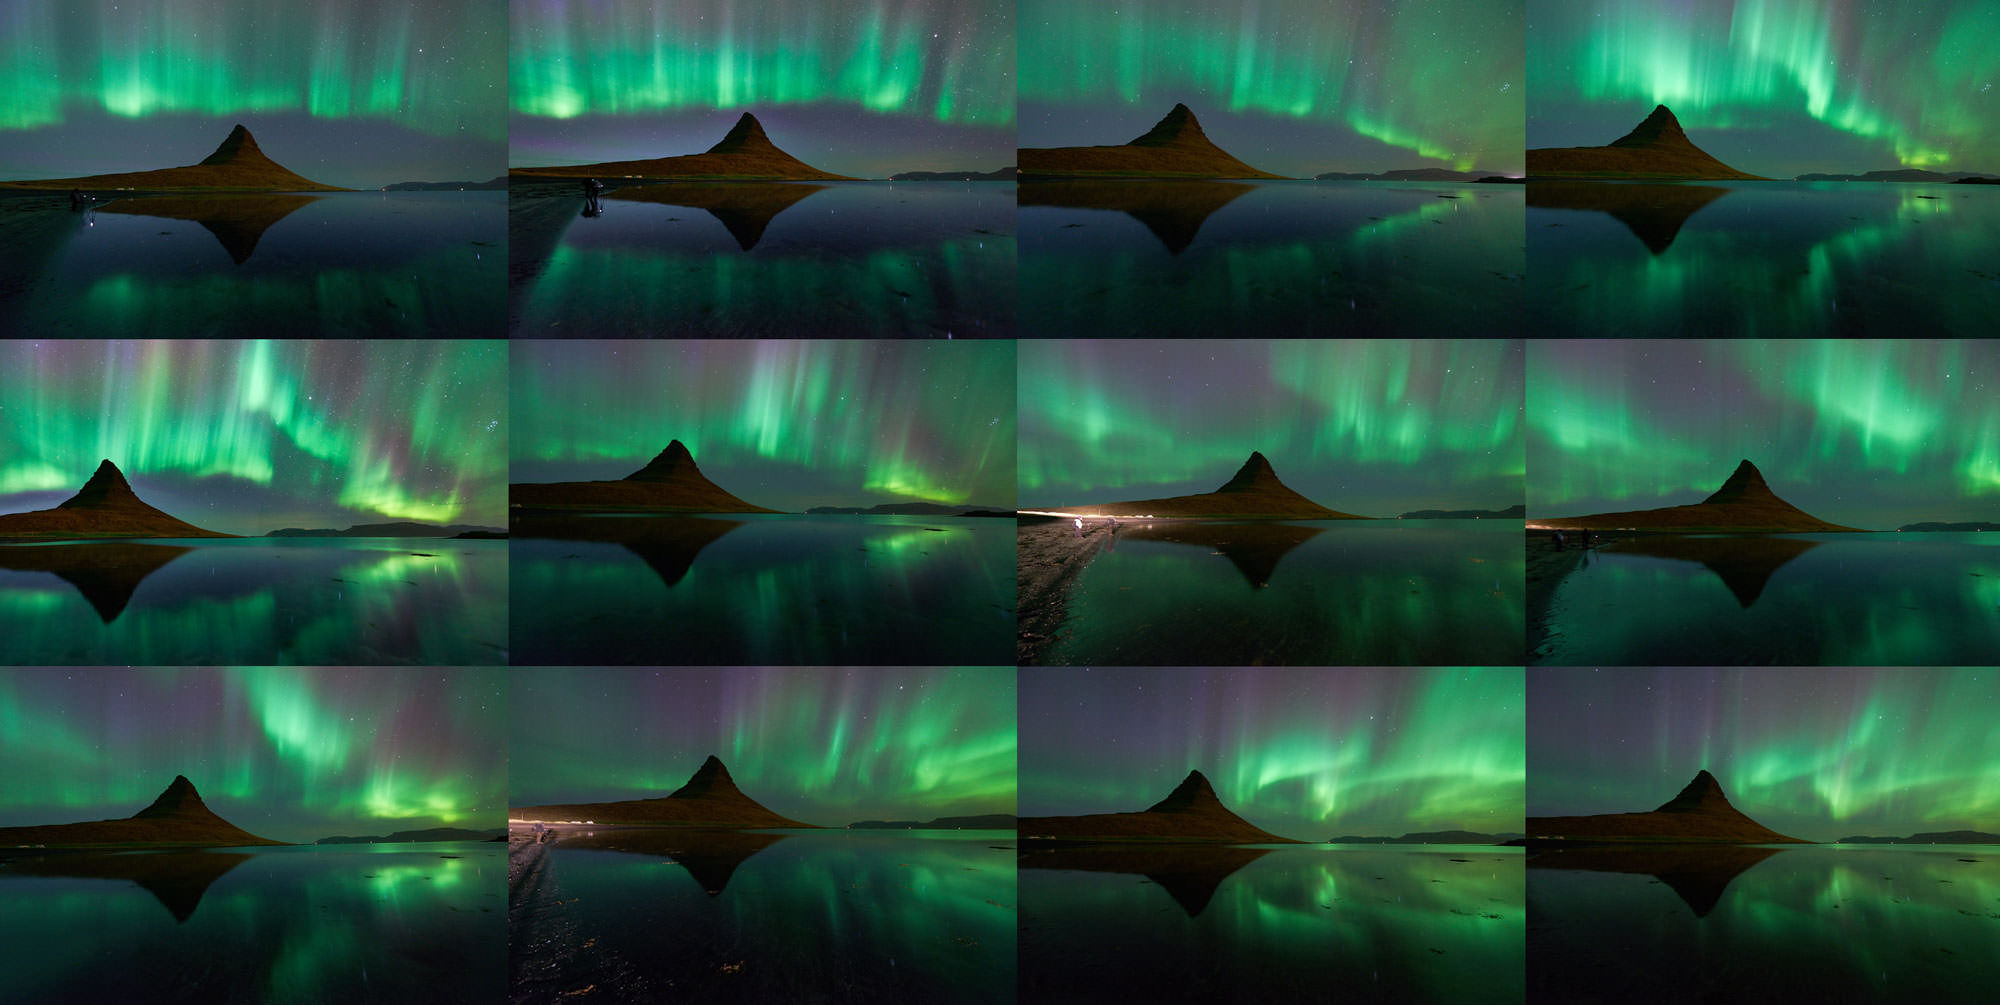
This set exhibits you one other sequence I shot on the similar location throughout that exact same aurora show. As soon as once more, you may see how the aurora dances throughout the sky weaving elegant gentle streaks throughout the sky. Since I shot this proper throughout from the freeway, you may see the sunshine spill from automobiles in a few photographs. I additionally cloned out the couple of lone photographers on the seaside within the closing picture I posted.
3.5) Publish-processing
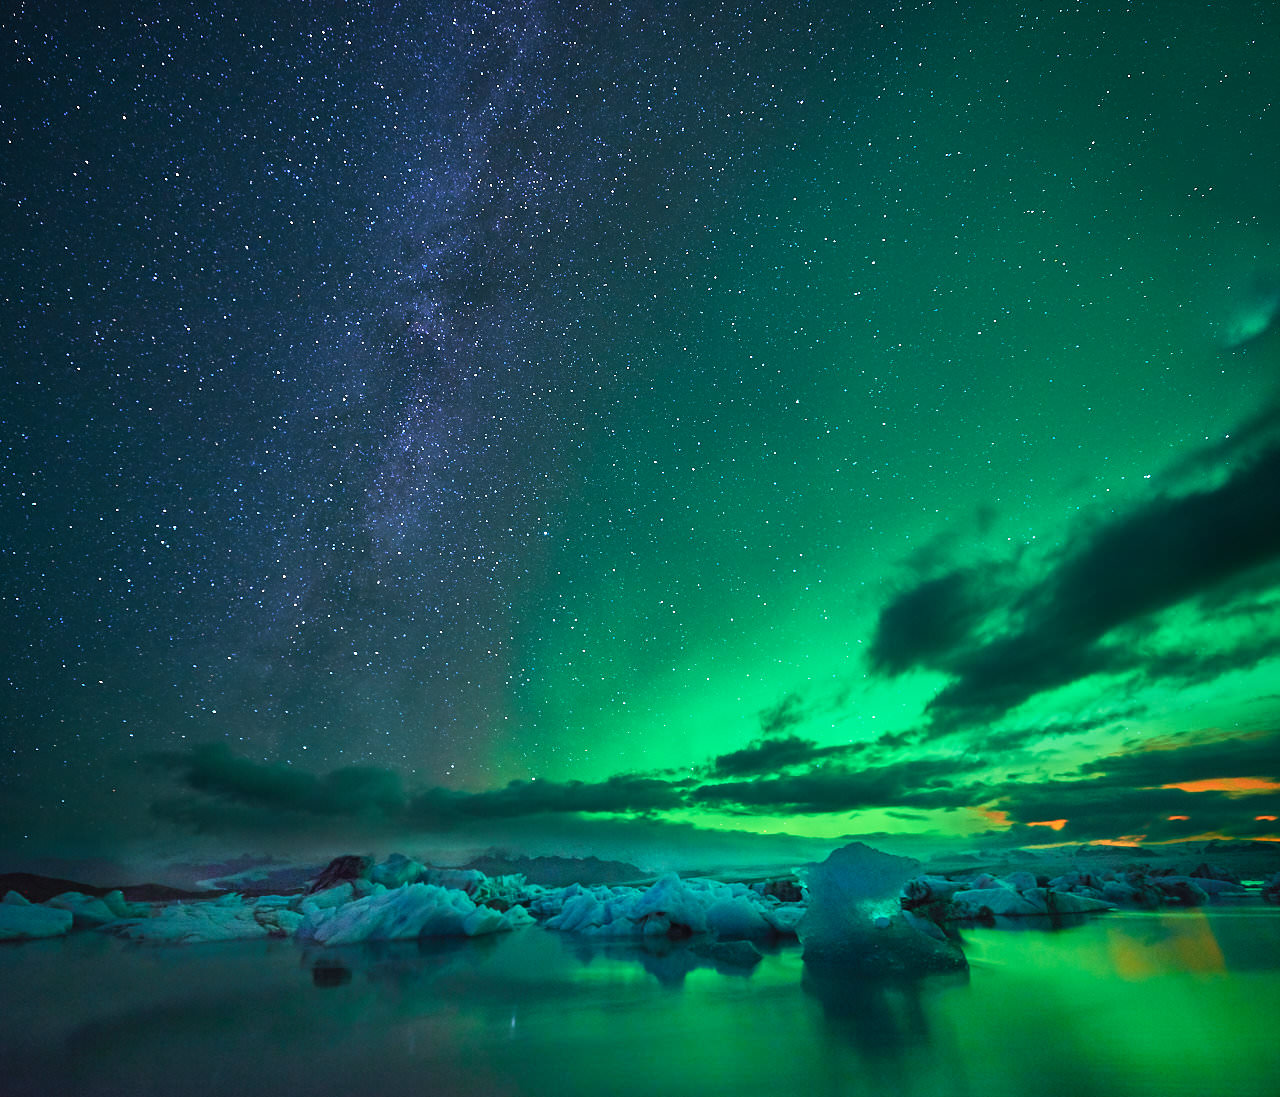
Properly the troublesome half is capturing the aurora. Typically any type of processing will yield a presentable consequence on condition that the composition is an interesting one. The under picture, which I’ll use as a primary instance is a picture I shot at Jökulsárlón, the well-known glacier lagoon in Iceland throughout that very same journey and I used to be fortunate to see a show of the Northern Lights right here. What did come as an sudden shock is the orange haze on the far proper. On the time of capturing, I may see a faint glow and supposed it to be gentle air pollution from a neighbouring city. It was solely after I had returned and shared my picture, that a number of commentators talked about that this glow was most certainly air pollution from the Holuhraun volcanic eruption within the Bardarbunga caldera. This makes this picture fairly distinctive to me, and the aurora was a bonus. That mentioned, this wasn’t probably the most good show I had seen and the transient however extra attention-grabbing shows have been in a course throughout from me, however with none type of foreground I may intensify it towards.

Coming again to the processing half, under is a sequence exhibiting three levels of the method.
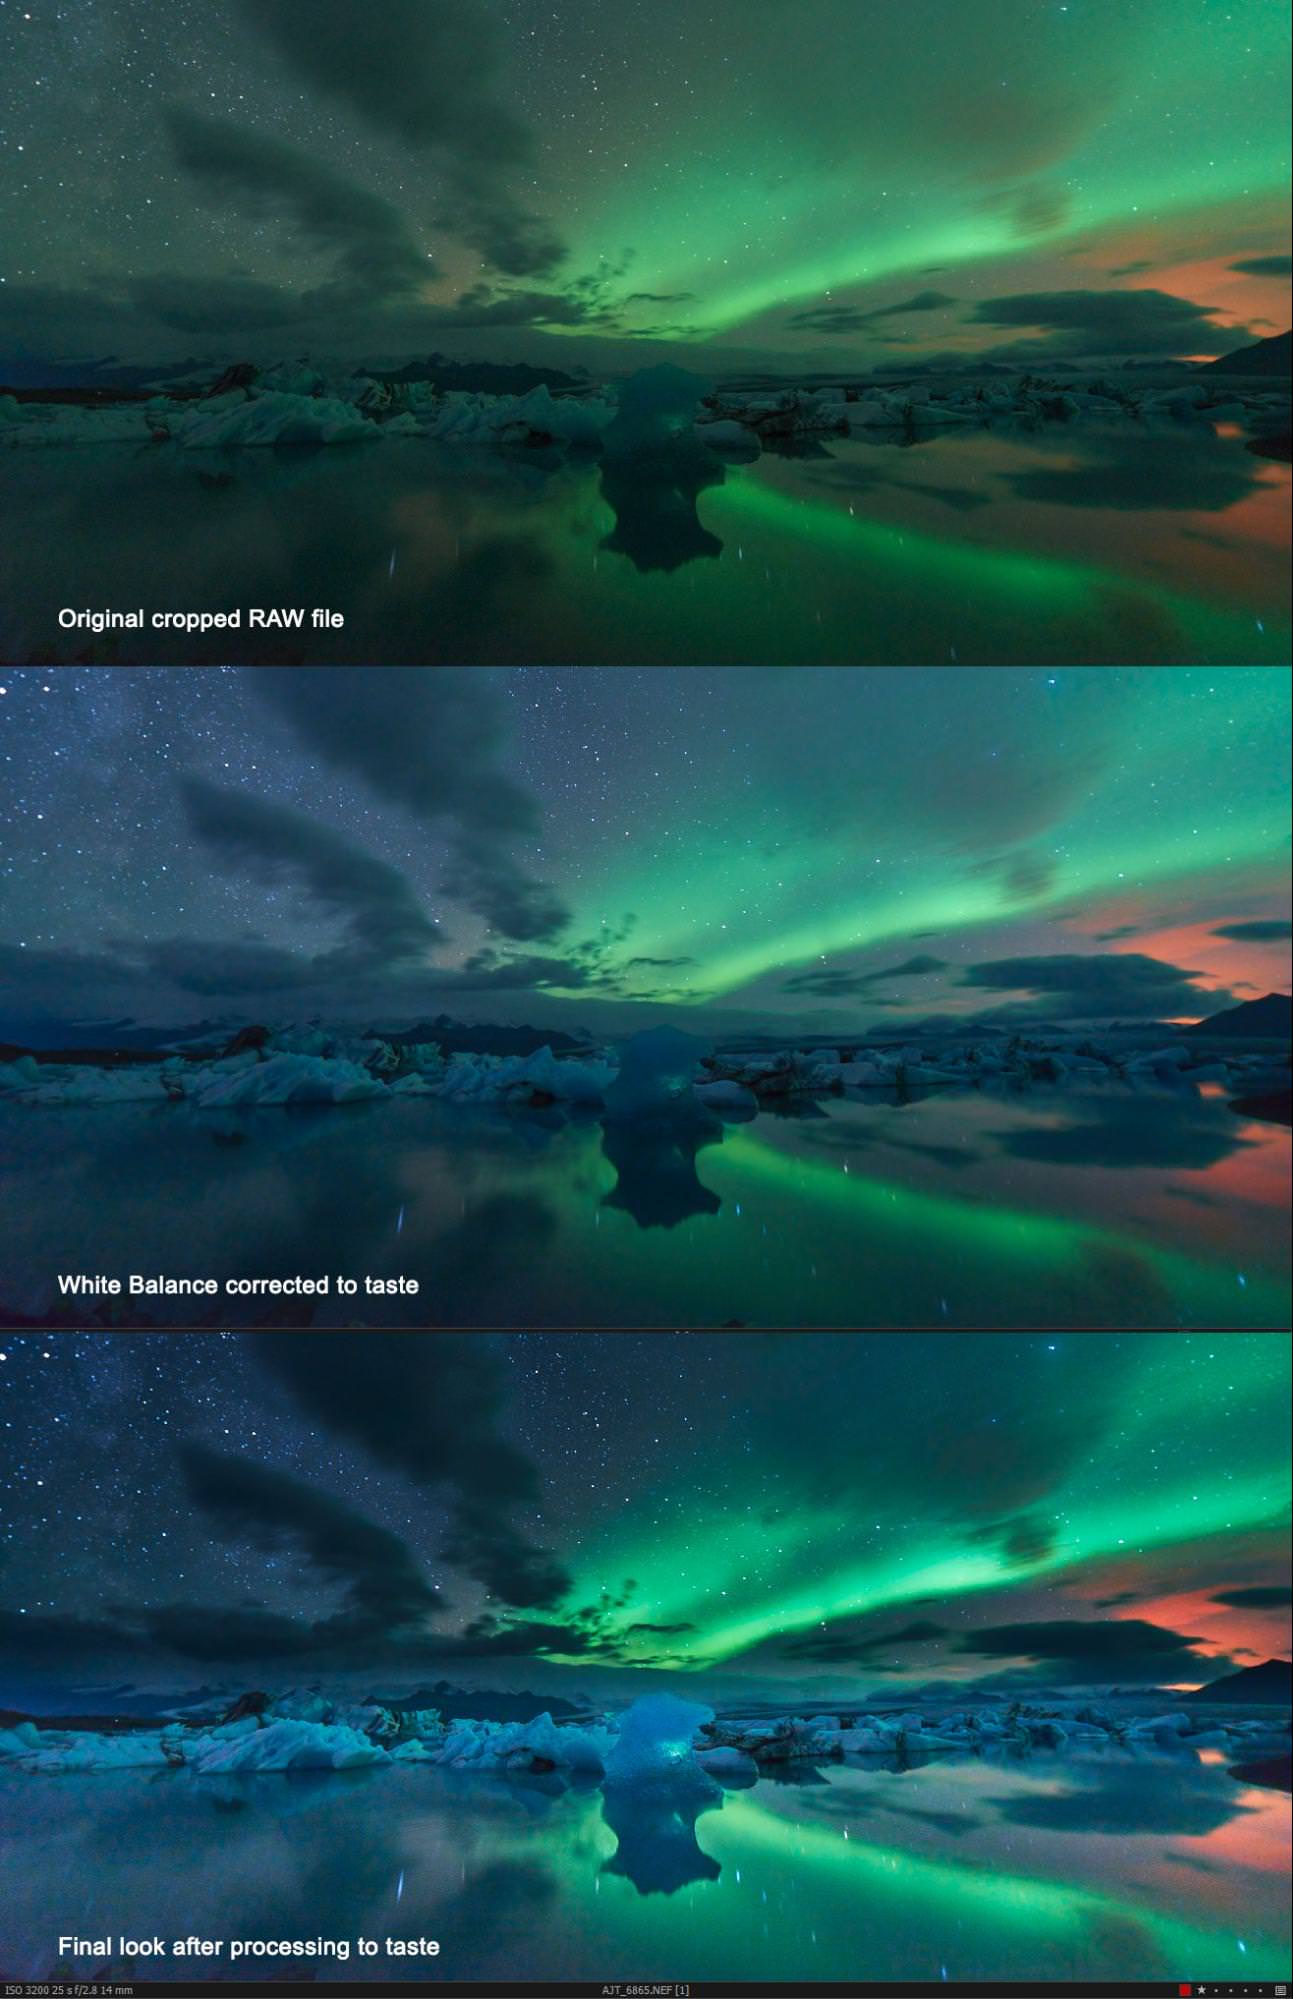
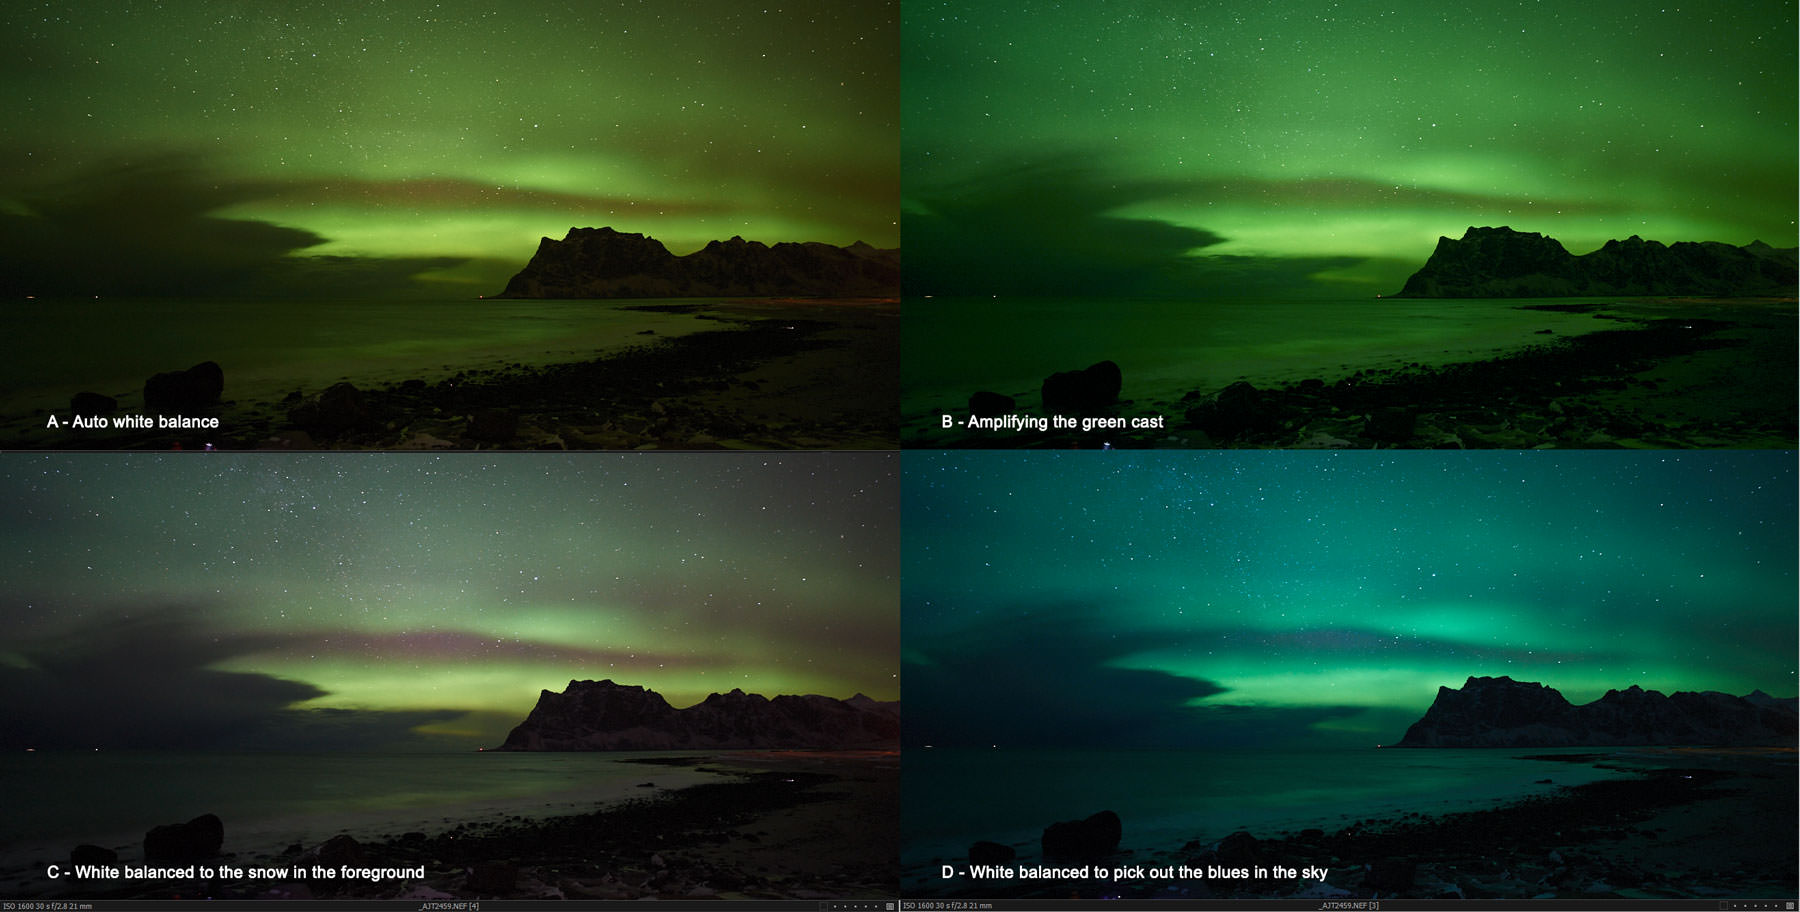
The unique RAW file had a heavy inexperienced forged which is what you’ll usually see while you shoot the auroras. Nonetheless, it does look reasonably boring and presently, I take pleasure in shifting the white steadiness to a cooler tone; simply sufficient to disclose the darkish blue tones of the sky. Now you may argue that the inexperienced forged is clearly the true color of the scene and I might agree, however given the inventive license I wished to train, I felt the wealthy blue tones of the iceberg accentuated the color of the picture fairly brilliantly; contrasting the greens and the blues with the orange-red haze of the volcanic air pollution makes it much more superb to me.
The ultimate picture has some additional inventive license; I balanced the tones of the iceberg by lifting them with a grad and contrasting the sky a tad. Nonetheless these are private preferences and are by no means the one manner it must be accomplished; that is only a information of the method that I used on this picture.
Under is one other instance of white steadiness. On this case, the selection of white steadiness will not be as clear-cut. Balancing to match the blue sky (D) provides a really cool, but alien rendition and probably the most interesting ones could be both (B) which simply amplifies the scene as I noticed it and even C which balances the tones to the white of the snow.
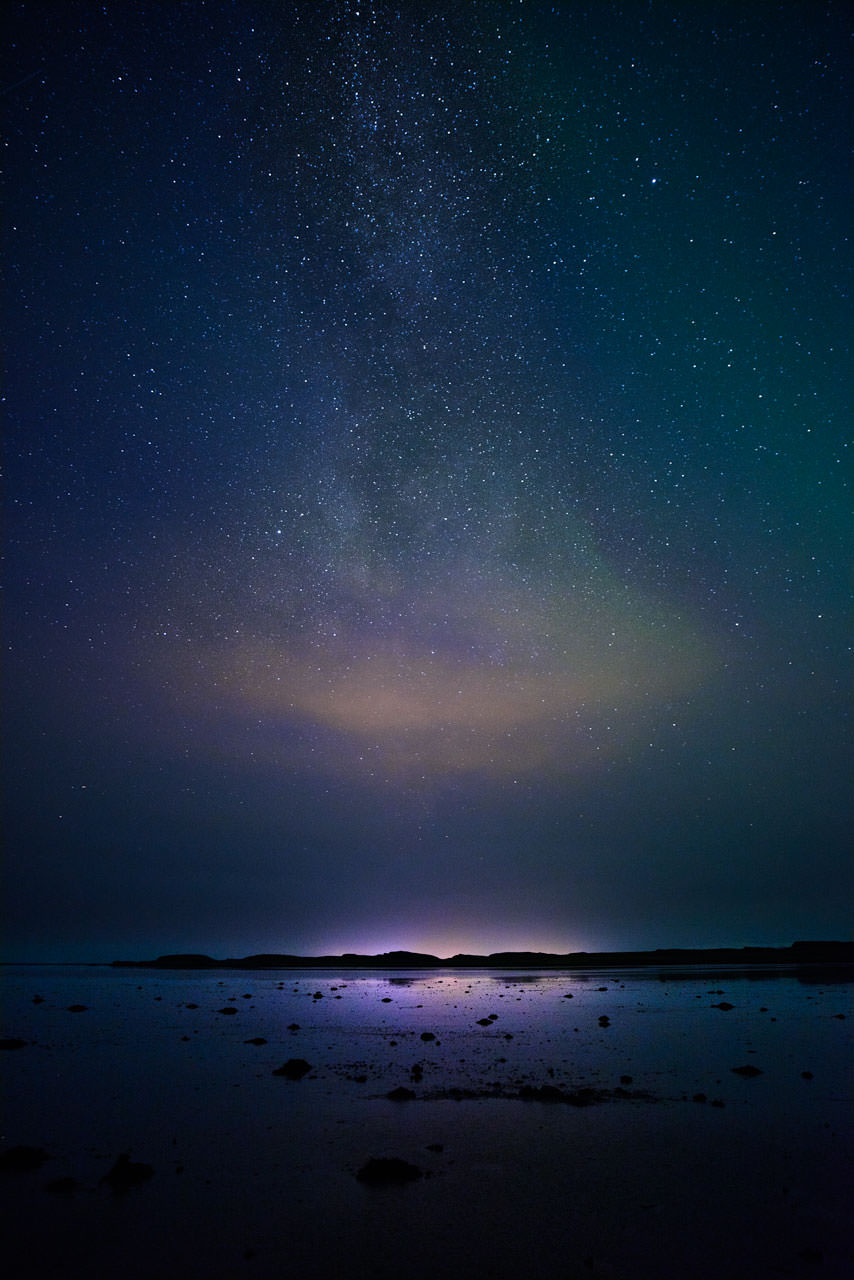
Under is yet one more picture from that very same night at Jökulsárlón. The aurora had waned fairly a bit and all that was seen was simply the leftover inexperienced haze on the appropriate, however as soon as once more, bisecting the Milky Manner nearly exactly and giving me yet one more three-part composition.
As you may see from all these photos, there may be a whole lot of selection within the form and motion of this bizarrely stunning phenomenon. These photos have been maybe probably the most presentable of my private assortment and have been shot throughout simply two journeys. I used to be immensely fortunate to witness some stunning moments and I hope to see it just a few extra instances in my lifetime. Till then, right here is one final picture – fairly a weak aurora however nonetheless a pleasantly stunning footnote to a lovely phenomenon.
Ajit Menon is an novice hobbyist photographer primarily based in New York Metropolis. In his day-to-day life, he’s a visible results artist, having plied his commerce for over 10 years in NY city (and round) and at present working at The Mill, an trade heavyweight on this discipline. Pictures has turn out to be fairly a ardour for Ajit over the past a number of years throughout which he has traveled to completely different components of the world to seize the spellbinding pure fantastic thing about the world. You may go to Ajit’s web site to see extra of his work.