The DJI Avata 2’s launch has created quite a lot of buzz throughout the drone neighborhood. After spending a while testing the DJI Avata 2, I’m right here to share my insights on the drone’s efficiency and my ideas on who this drone is really for. I’ll additionally present tips about how one can set it up and really helpful settings that can assist you get probably the most out of this spectacular drone.

Study extra in regards to the totally different FPV programs in our purchaser’s information: https://oscarliang.com/fpv-system/
Unhealthy Information for European Customers – No FCC?
Up to date on 16 April 2024
Should you reside in Europe, it’s best to suppose twice earlier than shopping for the Avata 2.
Earlier than delving into the specifics, it’s essential to know what FCC and CE modes imply. The Federal Communications Fee (FCC) in america and Conformité Européenne (CE) in Europe regulate the ability output and frequencies that digital units, together with drones, can legally use.
So the Avata 2 is in both FCC or CE mode. In FCC mode, you get all of the channels and RF energy obtainable from the Avata 2. Nevertheless, in CE mode, channels are restricted and RF energy is massively lowered to satisfy European rules.
The DJI Avata 2, like its predecessors, was anticipated to permit customers to modify between FCC and CE modes utilizing a recognized hack—the “ham file”. For these in FCC areas, the hack nonetheless works. Nevertheless, the state of affairs in CE areas is kind of totally different. The drone now not acknowledges the ham file for switching to FCC mode or accessing extra guide channels. In actual fact, Channel Mode is locked to Auto (the choice is grayed out), and you can’t choose Handbook mode anymore, not to mention change frequency, channel, or bandwidth. This modification has understandably led to frustration amongst European customers, as this implies their vary and video high quality will likely be severely lowered.
Not all hope is misplaced for CE customers because of third-party options just like the Drone Tweaks app on Android or iOS units, which prices €26 per 12 months. Whereas I’ve not personally examined this app and unsure the way it impacts your guarantee, it’s presently the one potential resolution I’m conscious of. This app permits the drone to function in FCC mode by modifying the unique DJI Fly app. As soon as put in, customers can manually choose FCC mode upon connecting the drone, unlocking each greater RF energy and extra channels. The hack ought to nonetheless work once you change the battery, however once you join the drone to the official DJI Fly app or carry out a manufacturing facility reset, you’ll have to reapply this hack. It’s irritating that customers should pay additional simply to get the total functionality of their drone, and it’s unclear if DJI will block this hack in future firmware updates.
Is that this hack authorized in Europe? No, it’s not authorized: the rules don’t permit you to exceed the licensed energy or occupy sure frequencies. You may take away this hack by merely resetting the headset by way of the “Settings” -> “About” -> “Reset All” menu.
I hope sooner or later there will likely be a less expensive or simpler resolution to this downside.
The place to Purchase?
For these contemplating buying the DJI Avata 2, I extremely advocate choosing the Fly Extra Combo. It consists of three batteries, that are important for prolonged flying periods. Given that every battery gives about Quarter-hour of flight time and takes round 30-45 minutes to cost, having three batteries means that you can fly nearly continuous. By the point you deplete the final battery, the primary one needs to be able to go.
Avata 2 Equipment on AliExpress: https://s.click on.aliexpress.com/e/_DDnLmJX
Fly Extra Combo (3 batteries)
ND Filters
DJI Avata 2 Drone Solely
DJI Goggles 3
DJI Distant Controller 3
Spare Batteries
The Fly Extra Combo additionally features a sturdy padded carry bag that neatly holds all of your gear.

Right here’s what comes with this complete package deal:
- 1x DJI Goggles 3 -2.0D Corrective Lenses (Pair)
- 1x DJI Goggles 3 Further Brow Pad
- 1x DJI Avata 2 Clever Flight Battery
- 1x DJI Goggles 3 Foam Padding
- 1x DJI Avata 2 Gimbal Protector
- 1x Sort-C to Sort-C PD Cable
- 2x DJI Avata 2 Propellers (Pair)
- 8x DJI Avata 2 Propeller Screw
- 1x DJI RC Movement 3 Lanyard
- 1x USB-C OTG Cable
- 1x DJI Avata 2 Drone
- 1x DJI RC Movement 3
- 1x DJI Goggles 3
- 1x Screwdriver

Avata 2 vs. Avata 1
When evaluating the DJI Avata 2 with its predecessor, a number of upgrades and enhancements develop into obvious.
Specs
Right here’s an in depth breakdown of the specs between the 2 fashions.
| Characteristic | DJI Avata 2 | DJI Avata 1 |
| Weight | 377g | 410g |
| Dimensions | 185x212x64mm | 180×180×80mm |
| Inner Storage | 46GB | 20GB |
| Ascent Velocity | 6 m/s (Regular Mode) 9 m/s (Sport Mode) |
6 m/s (Regular Mode, Sport Mode) |
| Max Velocity | 8 m/s (Regular mode) 16 m/s (Sport mode) 27 m/s (Handbook mode) |
8 m/s (Regular Mode) 14 m/s (Sport Mode) 27 m/s (Handbook Mode) |
| Hover Time | 21 Minutes | 18 Minutes |
| Flight Time | 23 Minutes | 18 Minutes |
| Max Flight Distance | 13.0 km | 11.6 km |
| Visible Positioning | Downward and Backward | Solely Downward |
| Digicam Sensor | 1/1.3-inch | 1/1.7-inch |
| Color Modes | Customary D-Log M 10-bit |
Customary D-Cinelike 10-bit |
| Max Decision | 4K/60fps HDR | 4K/60fps |
| Video Transmission | O4 (OcuSync 4) | O3 (OcuSync 3) |
| Latency | 24ms (1080p/100fps) 40ms (1080p/60fps) |
30ms (1080p/100fps) 40ms (1080p/60fps) |
| Max Video Vary | 13km | 10km |
| Reside View High quality | 1080p @ 30/50/60/100/120fps | 1080p @ 30/50/60/100fps |
| Max Bandwidth | As much as 60MHz | As much as 40MHz |
| Max Video Bitrate | 60Mbps | 50Mbps |
| Battery Capability | 14.76V 2150mAh Li-ion | 14.76V 2420mAh Li-ion |
| Battery Charging Time | 45 minutes (with Charging Hub) 1 hour 28 minutes |
2 hours half-hour |
| Battery Power | 31.7 [email protected] | 35.71 [email protected] |
| Battery Weight | 145g | 162g |
| PD Quick Charging | Sure | No |
Characteristic Enhancements
- Weight and Propulsion: The Avata 2 is over 30 grams lighter than its predecessor, with an improved propulsion system that improves most flight distance from 11.6km to 13km.
- Flight Noise: Because of the lowered weight and up to date propulsion system, the flight noise of the Avata 2 is considerably decrease in comparison with the unique mannequin.
- Flight Path Accuracy: The addition of backward visible positioning helps the Avata 2 navigate tighter areas extra exactly.
- Digicam and Stabilization: Enhanced digicam capabilities and stabilization contribute to superior video high quality within the Avata 2.
- Video Transmission: The introduction of DJI’s O4 video transmission system extends the utmost transmission distance to 13km and will increase the utmost video bitrate from 50Mbps to 60Mbps, enhancing general video high quality.
- Charging: The Avata 2 helps PD quick charging, considerably decreasing charging occasions. The included charging hub permits for a full recharge in simply 45 minutes.
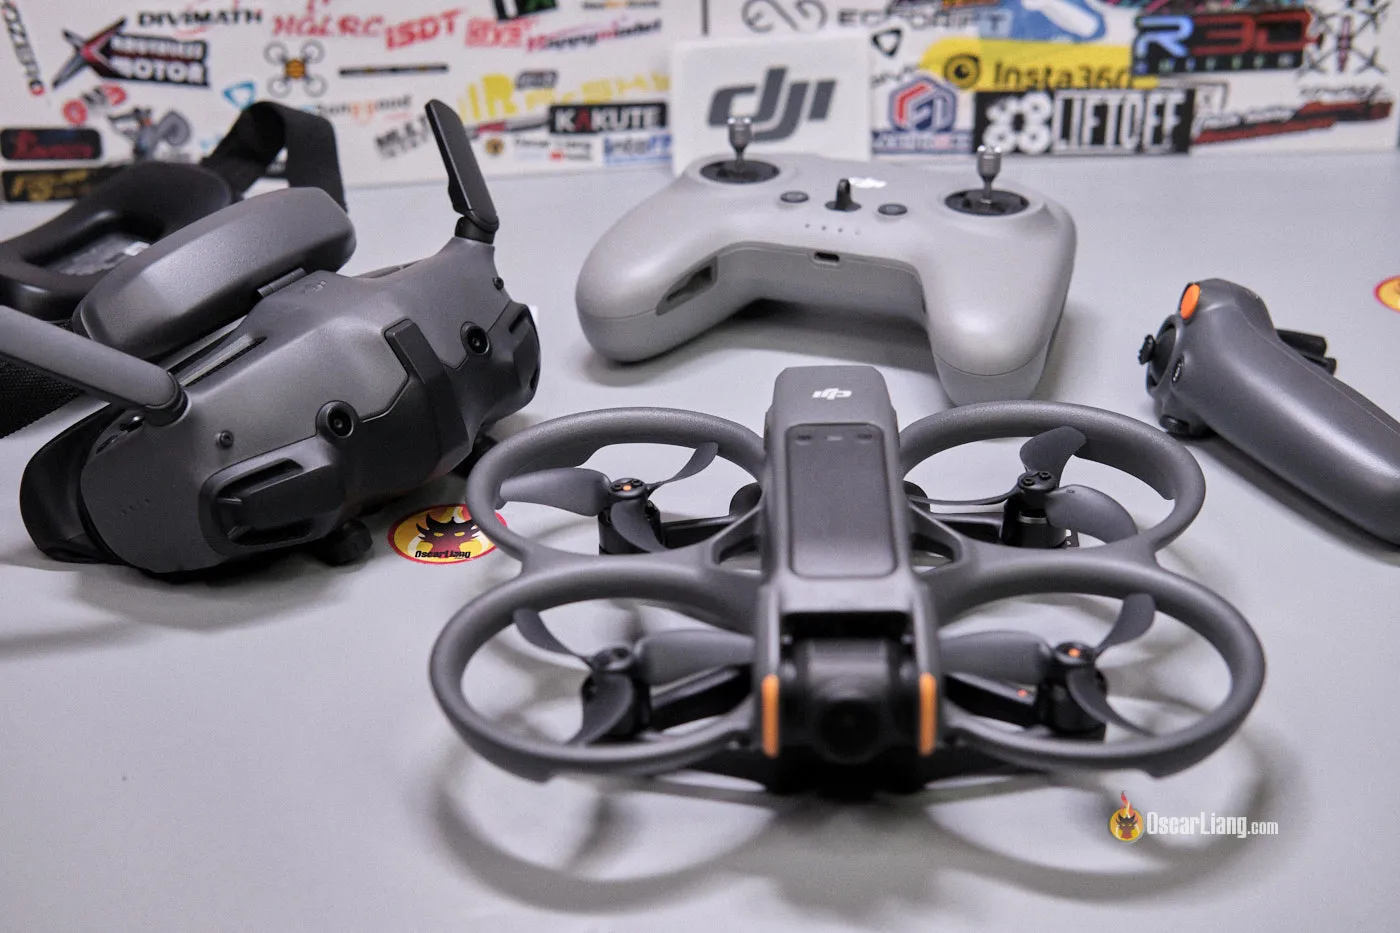
Nearer Take a look at Avata 2

Design Adjustments
The DJI Avata 2 is designed as a cinewhoop, a sort of FPV drone geared up with built-in propeller guards for enhanced security. This design is especially helpful for flying at low altitudes and indoors, permitting you to securely get extremely near topics.

In comparison with its the unique DJI Avata, the Avata 2 is noticeably lighter. A major design change is the shift from a “pusher configuration,” the place propellers are inverted, to a normal setup with motors on prime.

One of many key enhancements within the Avata 2 is the adoption of normal T-mount props. This replace is especially advantageous for drone fanatics who take pleasure in customizing their setups, because it permits for the simple alternative of propellers and using aftermarket choices with out requiring adapters.

The DJI Avata 2 weighs 239g with out battery, or 386g together with battery, barely heavier than the marketed weight. Its weight complies with European class C1, which is likely to be thrilling information for EU pilots (The C1 label on the appropriate facet of the drone confirms that).
Storage
Furthermore, the interior storage capability has been elevated from 20GB to 46GB. This improve considerably extends potential recording occasions, accommodating roughly 90 minutes at 1080p 60fps, 60 minutes at 2.7K 60fps, or 40 minutes at 4K 60fps. A 256GB SD card permits for 4 hours and 20 minutes of 4K 60fps footage.
For many who require extra storage, the drone nonetheless helps using an SD card. For optimum efficiency, particularly when recording in 4K, deciding on the appropriate SD card is essential. Try my suggestions for the very best SD playing cards for 4K video recording right here: https://oscarliang.com/sd-cards-fpv/
The locaiton of the SD card slot and USB port is way simpler to entry in comparison with the earlier Avata, and it’s protected by a rubber cowl from water splash and dusts.

Digicam and Video High quality
The digicam on the DJI Avata 2 marks a major improve from its predecessors, incorporating a 1/1.3-inch sensor just like that discovered within the DJI Osmo Motion 4. This bigger sensor enhances imaging capabilities, significantly in low-light circumstances, and gives improved dynamic vary, making it adept at dealing with scenes with different lighting.
The digicam’s high quality is nice sufficient that many customers would possibly discover it a viable alternative for separate motion cameras just like the GoPro Hero or DJI Osmo Motion. The inclusion of 10-bit Dlog-M is especially helpful for post-production, permitting for finer colour grading and element enhancements.

The drone’s Digital Picture Stabilization (EIS) has additionally seen enhancements. The built-in Rocksteady 3.0 Stabilizatio is especially helpful for many who require instantly usable footage with out extra processing.
For customers searching for extra granular management over stabilization, Gyroflow can be utilized. That is an open supply software program permits for detailed changes to stabilization parameters, providing a customizable strategy to managing video smoothness. Nevertheless, for comfort and ease of use, RockSteady offers on the spot stabilization immediately from the drone, eliminating the necessity to run footage by way of extra software program.
Observe that ND filters can be utilized on the Avata 2, however have to be bought individually right here:


Battery and Charging
The DJI Avata 2 represents a notable development from its predecessor, significantly when it comes to battery life and the mechanism for battery set up. The introduction of a brand new pinch mechanism simplifies the method of swapping batteries and ensures they continue to be securely in place even throughout a crash.


Not like typical LiPo batteries discovered in lots of FPV drones, the Avata 2 makes use of lithium-ion batteries. These batteries have a nominal voltage of 14.76V and a most voltage of 17V, which is similar to a 4S. The compact but strong 4S 2150mAh battery helps spectacular flight occasions of as much as Quarter-hour.
There are two methods to cost the battery: utilizing the Charging Hub or immediately charging the drone with the battery put in.

Charging Time:
| Charging Hub (max 60W) | Straight Charging Drone (max 30W) | |
| From 0 to 100% | approx. 45 min | approx. 88 min |
| From 10 to 90% | approx. 30 min | approx. 60 min |
The charging hub is kind of sensible, it fees one battery at a time and prioritizes the battery with probably the most cost remaining. This ensures the quickest turnaround attainable, enabling you to get again within the air with minimal downtime.
Get some spare batteries right here:
The charging hub additionally acts as a powerbank to cost your smartphone, GoPro, distant controller or goggles. Join the system by way of USB-C, and it’ll use the drone battery as energy supply. It at all times discharges the battery with the bottom energy stage first.
Sensors

Sadly, the DJI Avata 2 doesn’t come geared up with impediment avoidance capabilities, not like the typical DJI digicam drones such because the Mini 4 Professional.
Nevertheless, the Avata 2 does incorporate downward and backward visible positioning sensors. These are utilized primarily in Regular and Sport modes to boost flight precision in tight areas and place maintain when hovering.
Distant Controller
For these accustomed to the movement controller from the unique Avata, the expertise with the Avata 2 feels much more intuitive. The Movement Controller simplifies the training course of, permitting customers to shortly be taught flying the Avata 2 with out the necessity for intensive and sophisticated coaching.
When utilizing the Movement Controller, you don’t actually take into consideration roll, pitch or yaw, the system will do all of the coordination for you. All it’s good to do is to regulate the velocity and route.


For many who choose flying the Avata 2 like a standard FPV drone, the Distant Controller 3 (RC3) is out there for separate buy. It’s vital to notice that the older Distant Controller 2 (RC2) is just not appropriate with the Avata 2.
Get the DJI Distant Controller 3 right here:

Whereas the brand new RC3 would possibly seem just like its predecessor, it options an inner antenna and detachable gimbal sticks, enhancing its compactness and ease of dealing with. One important benefit of the RC3 is its functionality to function in guide mode (M mode), granting pilots full freedom to navigate the skies.


Moreover, the RC3 is appropriate with most FPV simulators, supporting the vast majority of widespread choices featured in our information: https://oscarliang.com/fpv-simulator/
For these critical about flying, the RC3 is important. It offers rather more exact management in comparison with the Movement Controller. Nevertheless, it’s value mentioning that whereas the RC3 ought to fulfill most pilots, it has its limitations. The smaller gimbals on the RC3 don’t present the identical stage of decision and management really feel as full-size gimbals discovered on extra superior controllers.

The battery lifetime of the distant is spectacular, lasting about 10 hours on a single cost. Though the battery is just not detachable, it may be conveniently recharged utilizing a USB-C port (5V 2A).
FPV Goggles
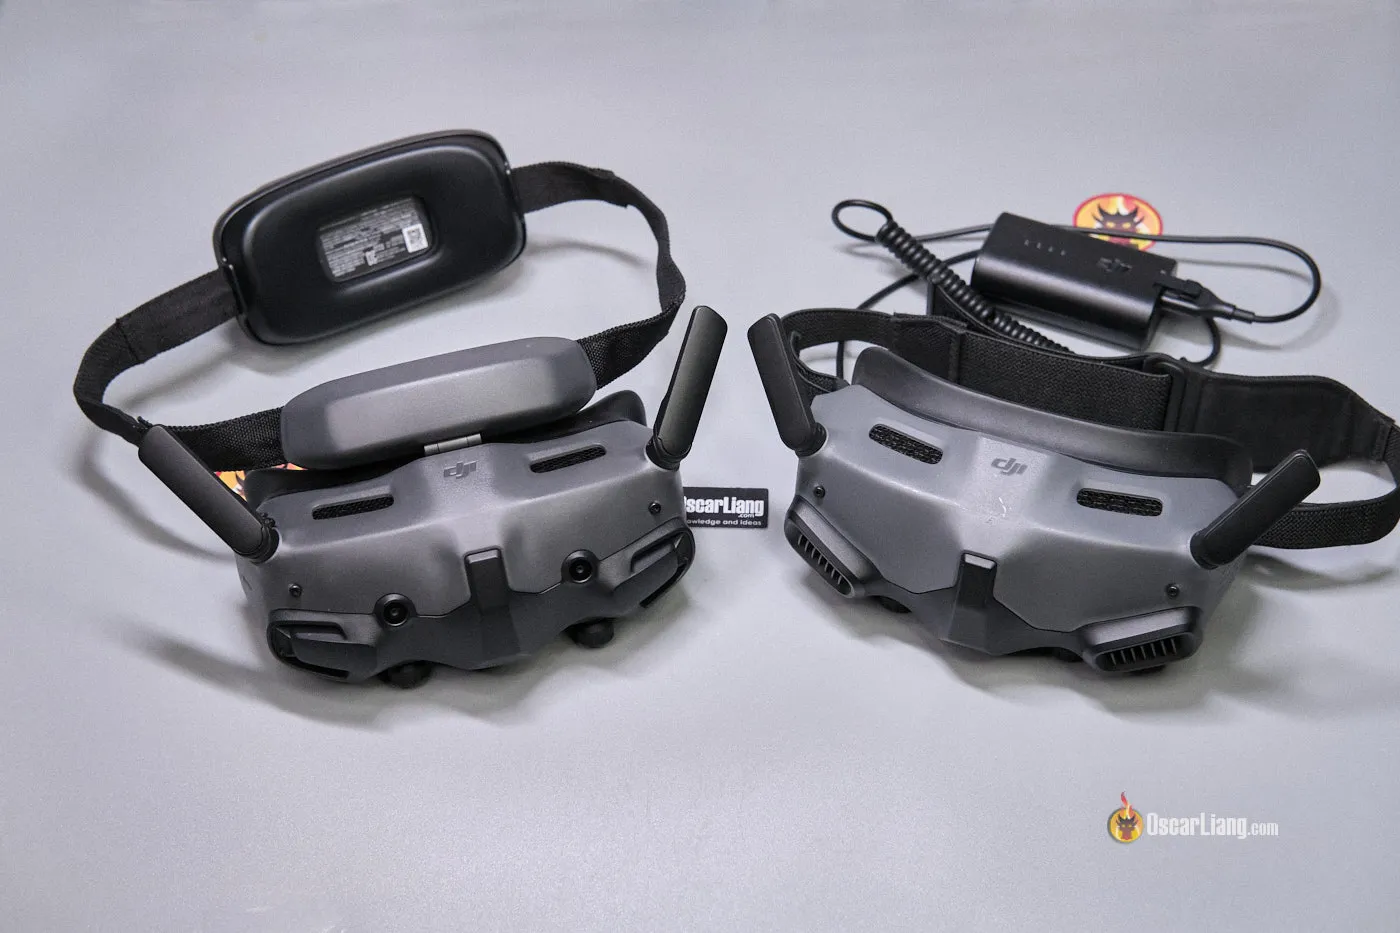
For a extra detailed dive within the DJI Goggles 3, and the way they examine to the Goggles 2, see my evaluation right here: https://oscarliang.com/dji-goggles-3/
One of many first stuff you’ll discover in regards to the DJI Goggles 3 is the built-in battery pack behind the top strap, just like the Goggles Integra.

This design considerably enhances consolation by eliminating the necessity for a dangling exterior battery pack. Though this implies you may’t swap batteries on the fly, the goggles might be powered and charged by way of a USB energy financial institution, which is a helpful characteristic for prolonged use.

The design of the Goggles 3 features a “brow relaxation” reasonably than having the faceplate press immediately towards your face. This seemingly “bizarre” resolution reduces strain in your eyes and nostril, making the goggles extra comfy, particularly throughout lengthy flight periods. Whereas the goggles don’t flip up like a visor, they permit for angle changes to make sure the show gasket suits snugly towards your face, optimizing the viewing expertise and minimizing mild leakage.
I imagine the Goggles 3 has related FOV because the Integra, so that you gained’t get as a lot blurry edges because the Goggles 2.
Antennas aren’t detachable on the Goggles 3, identical to the Goggles Integra.

The goggles additionally characteristic focus and IPD (Interpupillary Distance) changes situated on the backside, just like the Goggles 2.

It’s thrilling to see DJI lastly cease utilizing the touchpad and changed it with a joystick, enhancing the tactile really feel and responsiveness of menu navigation. This modification makes the person expertise rather more intuitive and satisfying.

Should you’re accustomed to the DJI Goggles 2, you’ll discover the on-screen menu and operation of the Goggles 3 nearly equivalent, guaranteeing a seamless transition between them.
The Goggles 3 are geared up with entrance cameras that present a real-time reside view of the environment, permitting pilots to see with out eradicating the goggles. Nevertheless, the sphere of view is extremely slender, which I discover limits its usefulness. Within the Settings->Show, you may set it to 3D which I discover attention-grabbing. By default it’s 2D – solely utilizing one digicam.

Just like the Goggles 2, the Goggles 3 screens flip off routinely once you take the goggles off to preserve battery when not actively in use.
It’s vital to notice that the Avata 2 drone can’t take off with out the FPV Goggles 3 being powered on.
The battery lifetime of the goggles is roughly three hours per full cost, with a charging time of about 1 to 1.5 hours by way of a USB-C connection (20W).
Get the DJI Goggles 3 from:
Compatibility
As of now, the DJI Avata 2 is appropriate completely with the next units:
- DJI Goggles 3
- DJI RC Movement 3
- DJI FPV Distant Controller 3
Sadly, it doesn’t presently assist earlier DJI FPV programs, together with DJI Goggles 2, Integra, Goggles V2, O3 Air Unit, and Vista. Nevertheless, the Goggles 3 does assist the DJI Air 3 and DJI Mini 4 Professional drones and can also be appropriate with the Distant Controller 2.
There’s hope throughout the neighborhood that DJI will lengthen backward compatibility to older gear, as they’ve completed prior to now following the discharge of the Goggles 2 and the unique Avata. We’re optimistic that such updates could also be offered within the close to future.
Consumer Expertise
For anybody new, there’s a important quantity of data to soak up. Later on this evaluation, I’ll attempt to clarify the setup course of intimately and ease the training curve. However utilizing the Avata 2 with the Goggles 3 gives a seamless and fascinating expertise proper out of the field.
The goggles match extra comfortably because of the deal with distributing weight and strain to the brow reasonably than different delicate areas just like the nostril or eyes. This design helps in decreasing mild leaks and offers a extra immersive viewing expertise.
The movement controller is an progressive addition, best for rookies attributable to its intuitive management mechanism. It permits new customers to fly the drone with minimal coaching successfully. Moreover, the movement controller can be utilized as an AR cursor throughout the goggles’ interface, offering a singular option to navigate settings and choices. For extra superior flying, nonetheless, the Distant Controller 3 is really helpful for its superior precision and management.
A notable security characteristic is the low voltage warning triggered when the battery reaches round 20%. On this state of affairs, the drone routinely initiates a return-to-home process, which might be manually overridden by urgent the Lock button. This enables the pilot to regain management, however the velocity of the drone will likely be restricted to preserver power.
The Avata 2 additionally introduces ‘Simple Acro’ mode, which simplifies performing flips and rolls with the push of a button, makes acro extra accessible to rookies. However for intermediate and superior customers, it felt fairly pointless to be trustworthy. It’s like what a $20 toy drone might do, and there’s an enormous pause between every transfer, simply doesn’t look good in footage.
Flight Efficiency
The very first thing I observed in regards to the DJI Avata 2 was how a lot quieter it’s in comparison with the unique Avata—not simply when it comes to quantity, however the sound profile was far much less irritating too.
When it’s simply hovering, place maintain is fairly spectacular. It will possibly nonetheless drift a little bit bit when it’s windy outdoors, or when it’s darkish, however when it’s indoor it’s surprisingly secure because of the extra visible positioning sensors. While you hit the wall, the drone will simply drop to the bottom and disarm, minimizing impression and injury.
In guide mode, it hovers round 30-35% throttle, which isn’t dangerous for a cinewhoop powered by a Li-ion battery. Regular mode feels conservative, providing gradual and easy flight traits. Nevertheless, switching to Sport mode actually unleashes the drone’s full potential, considerably boosting its velocity and maneuverability.
When it comes to general flight efficiency, the Avata 2 met my expectations for a cinewhoop. It’s extra agile and responsive than the unique Avata, because of its lighter weight. For a cinewhoop, it’s fairly capably. Nevertheless, when in comparison with a freestyle FPV drone, it feels considerably underpowered and may seem wobbly throughout sharp turns—a typical trait for cinewhoops, however it nonetheless confirmed enchancment over the unique Avata, which tended to dip throughout aggressive maneuvers. Whereas the Avata 2 isn’t designed for aggressive freestyle maneuvers—it struggles to recuperate from dives and inverted strikes—it excels at cinematic cruising, whether or not indoors or out. It’s vital for newcomers to concentrate on these traits to set sensible expectations.
I actually loved utilizing the movement controller, it felt intuitive and provided a completely totally different flight expertise – it’s like taking part in a online game. As an skilled FPV pilot, I nonetheless choose the standard distant controller for its precision and familiarity—it’s simply what feels proper after years of flying. Nevertheless, for rookies, the movement controller gives an easy and fascinating option to shortly get into the sport.
The drone additionally dealt with 20MPH winds moderately nicely, although it did expertise some wobbling and struggled towards headwinds, particularly when it voltage will get low. Avoiding flying in excessively windy circumstances with the Avata 2 to stop these points.
The highest velocity of the Avata 2 is simply over 100km/h.
Sturdiness
One noticeable change within the DJI Avata 2 is its building, which feels barely extra fragile than its predecessor. This appears to be a deliberate trade-off to scale back weight and improve flight efficiency.

It’s not significantly crash-resistant to be completely trustworthy; I had just a few crashes with timber and it fell to the bottom from 1-2 meters excessive, and the plastic on the propeller guard cracked.

I’ve been cautious to keep away from crashes since I purchased this drone with my very own cash and don’t wish to break it, but when I, as a pilot with over 10 years of expertise, can injury it inside my first week of flying it, new pilots are more likely to break it too. That’s why it’s vital to get DJI Care once you decide up the Avata 2, so you may have it repaired or changed at a decrease price. They even cowl “flyaways,” which is good.
Vary and Reliability
The earlier DJI O3 video hyperlink—used within the Avata V1 and Goggles 2—was already spectacular, however DJI has gone one step additional with the introduction of O4. The brand new system not solely offers stable connectivity but in addition delivers distinctive video high quality.
The Avata 2 boasts a formidable video vary of as much as 13km, which is a commendable enchancment. Moreover, the drone is provided with a GPS-based Return to Residence characteristic that acts as a security internet in case of video hyperlink loss or when the drone hits a failsafe. This dependable characteristic ensures that the drone can autonomously return to its launch level (fingers crossed), which is a reassurance for any pilot flying in difficult circumstances.
To find out for those who can fly additional, it’s best to monitor the bitrate (backside proper of your display), which is able to lower as you fly additional away. When the bitrate will get too low, you’ll begin to see a blurry picture and even stuttering within the video feed, indicating that it’s time to show again to keep away from the chance of dropping sign totally.
If you’re in FCC mode with the utmost bitrate set to 60Mbps and flying line of sight in a comparatively interference-free atmosphere, you may count on the bitrate to stay round 55-60Mbps inside 1km of vary. The bitrate might drop to 40-45Mbps at 2km, and 15-20Mbps at 5km.

Equally vital to contemplate is the flight time—whether or not you’ve gotten sufficient battery to return. When it’s windy, you’ll use extra energy flying right into a headwind, so it’s unwise to imagine you may fly away utilizing 50% of the battery and use the opposite half to fly again dwelling; it doesn’t at all times work that manner attributable to wind circumstances. At all times depart some margin for error, reserve some battery simply in case, and keep away from making an attempt long-range flights on windy days.
As a matter of reality, I imagine the O4 hyperlink is able to long-range, however the Avata 2 drone itself is the bottleneck—the battery runs out earlier than the video hyperlink (bearing in mind the gap it’s good to cowl to return dwelling).
Remaining Ideas: Who Is the DJI Avata 2 For?
The DJI Avata 2 incorporates a number of the most superior know-how obtainable within the drone market right now, however it will not be the proper match for everybody.
Cinematic Flying and Cinematography
Designed with flexibility in thoughts, the Avata 2 is a perfect device for videographers preferring to keep away from the complexities related to conventional FPV drones. Its means to carry place and have a tiltable digicam provides a stage of versatility unmatched by typical FPV drones, making it an outstanding alternative for aerial filming.
Get the Fly Extra Combo right here:
Constructing your individual cinewhoop offers unparalleled flexibility. You have got full management over each part, from the motors to the digicam and past, permitting you to tailor your drone to your precise specs and flying model. This stage of customization can result in superior efficiency, particularly for many who take pleasure in tweaking and optimizing their setups.
Nevertheless, a customized construct entails a steep studying curve, particularly for newcomers to the passion. Constructing and sustaining your drone requires a radical understanding of its elements and programs, which might be daunting however rewarding for many who benefit from the technical challenges.
The DJI Avata 2 comes as a whole package deal, together with goggles, a distant controller, batteries, chargers, and the drone itself. This all-in-one resolution is able to fly straight out of the field with very respectable video high quality. It’s geared up with built-in GPS for return-to-home performance and top-of-the-line video transmission programs available on the market. For these much less inclined to delve into the technical elements of drone constructing and upkeep, the Avata 2 is a improbable alternative. It gives a hassle-free expertise with the additional benefit {of professional} look, which generally is a important issue for industrial use, similar to aerial videography for actual property. It additionally appears extra skilled than customized constructed cinewhoops which issues for some folks.
Rookies
For these new to the drone scene, the Avata 2 presents an interesting choice. It’s significantly appropriate for people considering experiencing FPV with out the daunting studying curve. Though the preliminary funding is likely to be substantial, the efficiency and options provided justify the associated fee for these critical about getting that top high quality FPV footage.
Freestyle
For FPV pilots centered on freestyle and quick tempo flying, the Avata 2 will not be the very best drone. Whereas it gives a simple entry level for rookies to choose up and fly, constructing your individual drone can present superior flight efficiency at a a lot decrease price. Try how cheaply you may construct a excessive efficiency freestyle drone: https://oscarliang.com/cheapest-fpv-drone-build/
Lengthy Vary
Whereas not probably the most environment friendly choice for long-range flights, the Avata 2 can truly be a good drone for mid/lengthy vary flights because of its spectacular video/management hyperlink, GPS capabilities and comparatively lengthy flight time. It’s been confirmed that the Avata 2 is able to finishing 5km spherical journey (10km complete distance).
The Execs and Cons
Let me sum up the professionals and cons of the Avata 2:
Execs
- Quieter than different cinewhoops of this dimension.
- No want for an additional GoPro on the drone.
- It will possibly truly fly very far with nice video feed and sign.
- The built-in 46GB reminiscence will prevent once you overlook your SD card at dwelling.
- Painless Expertise: Should you like flying cinewhoop, the Avata 2 is genuinely an ideal drone. Greater than adequate to avoid wasting you from all the difficulty of constructing your individual.
- Characteristic Wealthy: A lot of nice options, similar to place maintain, altitude maintain and return to dwelling options, it’s simply good.
- Dynamic Management: Whereas in flight, the power to begin and cease recordings or modify the digicam angle mid-air enhances flexibility and management, permitting for dynamic shot composition.
- Newbie-Pleasant: Excluding the associated fee, the Avata 2 is definitely a wonderful drone for rookies attributable to its intuitive controls and forgiving flight traits.
Cons
- Top restrict of 500 meters.
- Lack of compatibility with older DJI gear.
- Energy is restricted by the system when voltage is low.
- No FCC Mode Exterior US: For most individuals outdoors of the US, particularly for these in Europe, it’s a disgrace DJI has compelled CE mode on the Avata 2 and there’s no straightforward option to unlock FCC in the meanwhile. CE mode have very restricted vary and channel choice.
- Price: As is typical with DJI merchandise, the value tag is substantial. Not solely is the preliminary buy dear, however so are the spare batteries and repairs.
- Locked Ecosystem: The drone operates inside a closed system, which means you can’t improve elements, together with the digicam. Whereas it’s attainable to mount an exterior motion digicam like a GoPro, doing so might adversely have an effect on the drone’s flight efficiency.
- Restricted Body Charges: Much like the O3 system, the reside view shares settings with HD recording, limiting the usability of decrease body charges like 30fps attributable to latency points with decrease body charges. The very best performing setting for reside flying is at 100fps. That’s why the Avata 2 could not totally substitute the necessity for a separate HD digicam for optimum recording high quality.
- Distant Controller Limitations: The DJI Distant Controller 3, whereas purposeful, options small gimbals that lack the decision and management really feel of full-size radio controllers. This generally is a important disadvantage for many who require exact management over their drone.
How one can Setup and Fly the DJI Avata 2
Establishing and flying the DJI Avata 2 for the primary time is an thrilling course of, streamlined to make sure you get airborne as shortly and safely as attainable. Right here’s an in depth information on what to anticipate and how one can get began.
Maiden Maiden Flight Preparation
Energy On: Start by powering on the FPV Goggles, Movement Controller, and the Drone. Press the ability button as soon as to verify voltage, after which maintain it down once more till all inexperienced LEDs mild up.

Goggles Tutorial: The FPV Goggles will information you thru a tutorial explaining how one can navigate the menu and use the movement controller to regulate your drone.
Activation: Earlier than your first flight, it’s good to activate the goggles (the drone and distant don’t require separate activation). Join the USB-C port of the goggles to a cellular system, launch the DJI Fly App, and observe the prompts for activation. You may obtain the app from DJI’s official obtain web page: https://www.dji.com/uk/avata-2/downloads


Alternatively, you should utilize a pc by downloading and putting in the newest model of DJI Assistant 2 (Client Drone Collection) from the identical hyperlink. Should you beforehand put in this for different DJI fashions just like the O3 or unique Avata, make sure you replace to the newest model.

Firmware Replace: The app will immediate you to replace the firmware.
Linking: Sometimes, the drone ought to already be linked to the movement controller and goggles proper out of the field, eliminating the necessity for guide pairing.
As soon as activated and up to date—a course of that ought to take not more than 10-Quarter-hour—you’re prepared for takeoff.
Flying Avata 2 with Movement Controller
For rookies, the Movement Controller would possibly really feel overwhelming as a result of there are such a lot of buttons. Even for knowledgeable pilots, it takes some getting used to. Listed below are the fundamentals to get you began:

- Arm the drone: Double-press the lock button to arm the drone, motors will begin spinning.
- Disarm: Double-press the lock button once more to disarm, the motors will cease.
- Takeoff: With the drone armed, press and maintain the Lock button to provoke takeoff. The plane will ascend to about 1.2 meters and hover.
- Braking: Throughout flight, press the lock button to make the plane brake and hover in place. Press it once more to renew flying.
- Touchdown: To land, press and maintain the lock button whereas the plane is hovering. It should land routinely and shut off the motors.
- Digicam Management: Alter the digicam angle by tilting the movement controller up or down.
- Yaw Management: Gently press the set off and tilt the distant left or proper to pan the drone.
- Lateral Motion: Use the joystick to maneuver the drone left or proper. Pushing it up or down adjusts the drone’s altitude, ascending or descending at about 1 meter per second.
- Ahead Flight: To maneuver ahead, merely press the set off all the best way.
- Flying Up and Down: For upward or downward flight, press the set off totally and tilt the controller up or down.
Superior Flying Methods
By default, your DJI Avata 2 will likely be in Newbie mode, which is designed to be very gradual and secure for brand new pilots. On this mode, you may’t swap flight modes, which helps stop accidents whilst you’re nonetheless studying. Nevertheless, as soon as you’re feeling assured with the fundamentals, you’re able to take the subsequent step.
Switching Off Newbie Mode: Go to Settings -> Management to show off Newbie mode. This can unlock the drone’s full capabilities and permit you to swap between totally different flying modes.
Sport Mode: By urgent the flight mode button, you may activate Sport mode. Consider it as Regular mode with a major velocity increase. It’s excellent for once you need a bit extra pleasure and an opportunity to essentially see what your drone can do.
Turtle Mode: Should you’re accustomed to Betaflight, you’ll respect Turtle mode. This setting helps the Avata 2 recuperate from crashes by flipping itself right-side up. It’s extremely helpful in case your drone finally ends up the wrong way up after a mishap, saving you a visit to retrieve and manually reset it. Yow will discover Turtle Mode within the Settings Menu.
Actual-time Reside View
By double tapping actually laborious on the appropriate facet of the goggles, you may activate realtime reside view of your surrounding utilizing the 2 entrance dealing with cameras.
By default it’s on 2D mode which solely makes use of one of many two cameras. You may set it to 3D within the Settings-> Show which makes use of each cameras and really improves usability IMO.
Head Monitoring
Head Monitoring is a captivating characteristic that enhances your flying expertise by linking digicam motion to your head actions. Right here’s the way it works:
To allow Head Monitoring, go to the highest menu of your Goggles. This enables the digicam gimbal to maneuver up and down as you progress your head up and down. While you look left or proper, the drone will pan in that route (because the gimbal doesn’t transfer in horizontal axis).
Initially, controlling the digicam together with your head whereas directing the drone with the movement controller would possibly really feel a bit unnatural. Nevertheless, with some follow, you may obtain dynamic and artistic pictures which might be troublesome to duplicate with conventional controls.
It’s vital to say that Head Monitoring solely works with the Movement Controller and isn’t supported by the Distant Controller 3.
Return to Residence
Maintain down the flight mode button can activate return to dwelling (RTH) throughout flight. Throughout return to dwelling you may achieve again management by urgent the Lock button. It’s very correct, touchdown inside 1 meter of the house level.
DJI Avata 2 additionally assist Low Battery RTH and Failsafe RTH.
Linking Units
Your Avata 2, distant, and goggles needs to be linked proper out of the field. Nevertheless, if it’s good to re-link them for any motive, right here’s how one can do it. Observe that there’s no devoted hyperlink button on the brand new units – to place them in hyperlink mode, you merely maintain the ability button for five seconds.
- Plane: With the drone powered on, press and maintain the ability button till you hear a steady beep, indicating the battery stage LEDs are blinking in sequence.
- Goggles: With the goggles powered on, press and maintain the ability button till the goggles begin to beep repeatedly.
- Completion: Linking is full when the beeping stops, and that the plane’s battery stage LEDs flip stable.
- Now repeat this for the distant, and the goggles.

Observe: There’s no must hyperlink the plane on to the distant as they convey by way of the goggles.
Firmware Replace
Personally I don’t rush to replace firmware – typically new firmware would possibly include some form of new restrictions. I at all times wait and see what the neighborhood’s suggestions is earlier than updating.
After a firmware replace, at all times restart your plane, distant controller, and goggles earlier than takeoff. This ensures all new settings take impact appropriately.
Essential: Firmware updates can reset flight parameters like RTH Altitude and Most Flight Distance. Be certain to notice your most well-liked settings beforehand and reapply them post-update.
If the replace fails, restart the plane, distant controller, goggles, and both the DJI Fly app or DJI Assistant 2 (Client Drone Collection). Then, try the replace once more.
FCC Unlock
Sadly DJI Avata 2 doesn’t assist manually switching amongst FCC, CE, and SRRC. The plane will establish the nation and area the place it’s situated in line with the situation of the cellular system and the GPS of the plane, and swap between FCC, CE, and SRRC following native legal guidelines and rules.
This implies in case you are outdoors of the US, the Avata 2 will routinely be in CE mode. There’s presently no free option to unlock FCC however I’ll maintain an shut eye on the state of affairs.
Greatest Transmission Settings
For CE customers, channel mode is about to Auto and can’t be modified, so you may skip to the subsequent part.
For FCC customers, the next are my really helpful transmission settings.
Channel Mode: Set to Handbook to achieve full management over transmission settings.
Frequency: Select between 2.4GHz or 5.8GHz. 2.4GHz for higher penetration by way of obstacles however restricted to at least one pilot at a time attributable to its slender bandwidth (only one channel obtainable). It additionally interferes with 2.4GHz radio hyperlinks similar to ExpressLRS, so DO NOT use 2.4GHz once you or different pilots are utilizing 2.4GHz radio hyperlinks. 5.8GHz is preferable for those who plan to fly with others, because it gives a lot wider bandwidth. Relying on interference, it’s possible you’ll discover one frequency gives higher sign than the opposite, if doubtful, attempt each and examine bitrate.
Bandwidth: Increased bandwidth offers higher picture high quality however will increase the chance of interference with different pilots. When flying solo, you may safely use 60MHz or 50MHz. When flying in teams, think about decreasing the bandwidth to 50MHz, 40MHz, and even 20MHz to attenuate interference.
Utilizing 5.8Ghz, it’s best to have 3 channels with 60MHz and 50MHz bandwidth. Should you solely have 1 channel obtainable, you should utilize the “ham file” hack to unlock the remainder of the channels, obtain the ham file and place it within the root listing of your goggles SD card: https://oscarliang.com/dji-fpv-system-fcc-700mw/#DJI-Goggles-2-and-O3-Air-Unit
Greatest Digicam Settings
To get probably the most out of the DJI Avata 2, I’ve discovered these digicam settings produce nice consequence for video high quality.
For finest flying expertise and don’t care a lot about recording:
- Mode: Auto
- Decision: 1080p 100FPS
- Colour: Customary
For finest cinematic footage:
- ND filter is a should, see why: https://oscarliang.com/nd-filter-fpv/
- Mode: Handbook
- ISO: 100 (or as little as attainable relying in your lighting), or Auto (then set Max ISO to 400 or 800 for additional flexibility)
- Decision: 4K 60FPS (Keep away from 30FPS as a result of latency is simply too dangerous for flying)
- Shutter Velocity: 1/120
- WB: Put White Steadiness on Auto first and see what the system select, then lock in with that worth, so WB is mounted throughout flight
- FOV: Broad
- Colour: D-Log M (for those who colour grade), or Customary (for those who don’t colour grade)
- EIS: OFF (for those who use Gyroflow), or Rocksteady
- Sharpness: -1 (you may improve sharpness in put up)
- Noise Discount: 0 (or +1 for lowlight reduces noise in the dead of night space)
For stabilization, the Avata 2 gives three modes: RockSteady, HorizonSteady, and Off. RockSteady is the default setting, offering strong stabilization. You may change this within the Settings > Digicam > EIS menu of the goggles. Should you choose to stabilize footage post-flight, disable EIS and set the digicam to extensive mode to assist Gyroflow offline stabilization.
Native side ratio is 4:3, by switching to 16:9 it has the highest and backside cutoff.

Some testing on Noise Discount worth, has an impression on shadow element and lowlight.

Some comparability on sharpness worth, personally I choose -1, however that’s private desire.

Video bitrates beneath totally different decision/body price:
- 4K 60fps: 130Mbps
- 4K 50fps: 120Mbps
- 4K 30fps: 90Mbps
- 2.7K 60fps: 100Mbps
- 2.7K 50fps: 90Mbps
- 2.7K 30fps: 70Mbps
- 1080p 120fps: 80Mbps
- 1080p 100fps: 70Mbps
- 1080p 60fps: 50Mbps
- 1080p 50fps: 40Mbps
- 1080p 30fps: 25Mbps
How one can Use Distant Controller 3
The Distant Controller 3 means that you can fly in full guide mode. You want to activate the RC3 first and replace its firmware by way of the DJI Fly App or DJI Assistant 2 earlier than utilizing it.
To hyperlink the Distant Controller 3 to your DJI Goggles 3, observe these directions:
- Goggles: With the goggles powered on, press and maintain the ability button till the goggles begin to beep repeatedly.
- Distant: With the distant powered on, press and maintain the ability button till it begins beeping.
- Completion: Linking is full when the beeping stops, and that the plane’s battery stage LEDs flip stable.
Observe: the Movement Controller will nonetheless work together with your drone, however you may solely use one controller at a time, depends upon which one connects to the Goggles 3 first.
Assign guide mode to the mode button: Within the Goggles Settings->Controls->Distant Controller->Button Customization, set Customized Mode to Handbook Mode.

Should you intend to fly in guide mode, ensure that to take away throttle stick self centering. By eradicating the again deal with rubber, you’ll discover two screws – tighten each screws will take away throttle stick self centering. By loosening or tightening each screws barely adjusts the friction, takes a little bit of trial and error to get it proper.

You may swap between Regular/Sport/Handbook flight modes utilizing the mode button.

To arm and disarm the drone in Regular/Sport modes, use these stick positions.
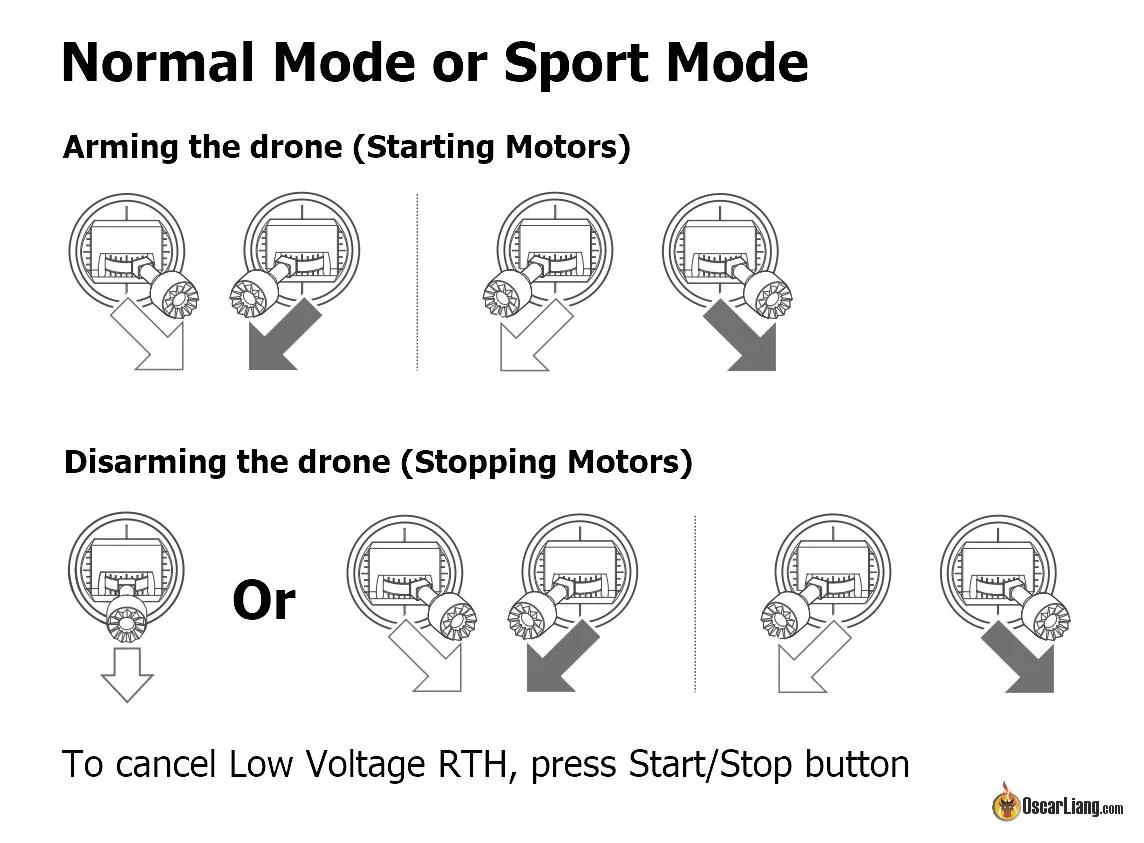
To arm and disarm the drone in Handbook mode, double press the Begin/Cease button. You may modify the digicam angle utilizing the highest left rotary swap.

In case of emergency, you should utilize the “Flight pause/Return to dwelling” button in any flight mode:
- Press as soon as the quad will cease and hover in place, and put it in Regular Mode.
- Press and maintain and it’ll activate return to dwelling; to cancel RTH, press it another time.

Set your charges and expo, I’m utilizing these for freestyle flying:
- 120/800/0.5
- 120/800/0.5
- 140/650/0.5
Different Suggestions and Tips
When flying over the altitude heigh restrict, the drone will go into Regular mode and gained’t allow you to fly any greater. You may improve the peak restrict as much as 500 meters (in Settings->Security), however it’s best to observe your native rules.
The DJI Avata 2 features a useful ‘Discover My Drone’ characteristic. To entry it, navigate by way of the goggles menu to Settings > Security > Discover My Drone. This characteristic exhibits video footage from the 30 seconds earlier than the drone was misplaced, aiding in its restoration. The footage is saved in inner reminiscence so SD card is just not required. Moreover, if the drone nonetheless has battery energy, you may activate the ESC Beeping operate beneath the identical menu to make the drone’s motors beep, serving to you find it by sound.
A helpful trick for goggle customers: place a chunk of tape on the sensor between the lenses. This prevents the screens from turning off once you take away the goggles, avoiding the transient delay when turning them again on.
Battery charging: as quickly as you insert the batteries into the charging hub, it can begin charging routinely. It should at all times begin with the one with highest energy stage so it finishes faster. If all of your batteries are low in energy stage, you may switch the remaining cost into one single pack so you may fly a bit longer – merely insert all of the batteries within the hub, press and maintain the ability button till the LED turns inexperienced. To cease, press and maintain the button once more.
To cost batteries within the discipline, I’ve been utilizing the Speedybee Discharger with an enormous 6S 10000mah LiPo. This is sufficient to recharge 6 of the Avata 2 batteries.
[Working in Progress, come back later xxx]
File Switch
Transferring recordsdata to a telephone:
The Avata 2 facilitates file switch by way of Wi-Fi by way of the DJI Fly app. Merely energy on the drone, activate the QuickTransfer operate within the app, and be certain that the drone and telephone are inside 2 meters of one another with out obstructions.
Transferring recordsdata to a pc:
Join the drone to your pc utilizing a USB cable with out powering on the Avata 2, an exterior drive ought to seem. If utilizing a reminiscence card, you may immediately insert the cardboard into your pc’s card reader.
Reside Feed Sharing (Video Out)
Reside feeds might be shared in 3 ways:
- Wi-Fi wi-fi sharing: Allow display sharing from the DJI Goggles 3 to a cell phone by way of Wi-Fi. Join the cellular system to the Goggles 3 by way of Wi-Fi and use the DJI Fly app to view the drone’s reside feed. This technique helps connection to just one cellular system. The latency is over 100ms, so it’s not best for flying utilizing this feed, however adequate for spectating. If that is too uneven, think about using a USB wired connection.
- Wired sharing: Join a cellular system to the DJI Goggles 3 utilizing an information cable and an OTG adapter. The linked cellular system will show the drone’s reside feed by way of the DJI Fly app. Like Wi-Fi sharing, this technique helps just one system. Latency is way decrease than WiFi.
- Viewers mode: Activate the published operate within the DJI Goggles 3 menu, permitting a number of goggles to obtain the reside feed with no viewer restrict. That is best for sharing the flying expertise with an viewers.
Observe: Needless to say you may solely use one sort of connection at a time, whether or not connecting to goggles or a cellular system.
Edit Historical past
- Mar 2024 – printed information in regards to the Avata 2
- Apr 2024 – evaluation printed