17.5K
An FPV digicam is a key element in FPV drone techniques, capturing real-time video that’s transmitted to the pilot’s goggles or monitor. These small and light-weight cameras boast ultra-low latency, huge dynamic vary, and supply important visible info for FPV drone pilots to navigate and carry out maneuvers. With advancing know-how, a few of the newest FPV cameras now provide onboard recording with picture high quality rivalling that of motion cameras, such because the DJI O3. On this information, we’ll talk about the important thing elements to contemplate when choosing the right FPV digicam for FPV drones.

Among the hyperlinks on this web page are affiliate hyperlinks. I obtain a fee (at no additional value to you) if you happen to make a purchase order after clicking on one in all these affiliate hyperlinks. This helps help the free content material for the neighborhood on this web site. Please learn our Affiliate Hyperlink Coverage for extra info.
Analog vs Digital FPV Programs

FPV techniques fall into two classes: analog and digital.
Analog FPV cameras aren’t appropriate with digital FPV techniques, and vice versa. Presently, there are three digital FPV techniques: DJI, Walksnail, and HDZero. Cameras designed for a particular digital FPV system aren’t appropriate with different digital FPV techniques.
For those who’re uncertain which FPV system to decide on, check out the professionals and cons of every system in my assessment: https://oscarliang.com/fpv-system/
FPV Digital camera Suggestions
Under are my high FPV digicam suggestions for every FPV system.
DJI O3
DJI Vista (Runcam Hyperlink)
For the DJI FPV System V1 that was launched again in 2018, there are a number of digicam choices that excel in numerous elements. These are appropriate with Runcam Hyperlink (also called Caddx Vista) and DJI FPV Air Unit. If you’d like the bottom latency (round 30ms), select a digicam able to 120fps, such because the Runcam Wasp, DJI OG cam, Nebula Professional and Professional Nano, or the Falcon Nano. Some older cameras that may solely deal with 60fps and may have increased latency, round 40ms.
Caddx Nebula Professional Nano
Smallest Digital camera

The Caddx Nebula Professional Nano is a superb selection for small FPV drones. It’s the smaller model of the spectacular Nebula Professional, supporting a 4:3 facet ratio and 120fps.
Though its picture high quality isn’t nearly as good because the bigger Nebula Professional as a result of smaller sensor and lens, it’s nonetheless one of the best obtainable possibility amongst nano-sized cameras. Be aware: Don’t confuse it with the Nebula Nano (non-pro), which is relatively disappointing.
You’ll find the Nebula Professional Nano digicam right here:
AE: https://s.click on.aliexpress.com/e/_DmvVECv
GetFPV: https://oscarliang.com/product-8a4i
RDQ: https://oscarliang.com/product-gj04
Walksnail
Walksnail presents a number of totally different digicam choices for various functions.
HDZero
HDZero presents a number of digicam choices for various functions.
HDZero Whoop Lite
Smallest Digital camera

The HDZero Nano Lite Digital camera is designed for ultra-light micro FPV drones, weighing a mere 1.5g. Mixed with the brand new Whoop Lite VTX at 4.5g and a 0.4g dipole antenna, this combo represents the world’s lightest digital FPV answer, weighing in at below 7g in whole.
Using the identical sensor because the Runcam Micro V2, this digicam presents switchable 4:3 / 16:9 modes, customizable picture settings, and distinctive low mild efficiency.
Discover the HDZero Whoop Lite Digital camera right here:
AE: https://s.click on.aliexpress.com/e/_DDtI5wD
GetFPV: https://oscarliang.com/product-dl3i
Analog
Dimension and Weight
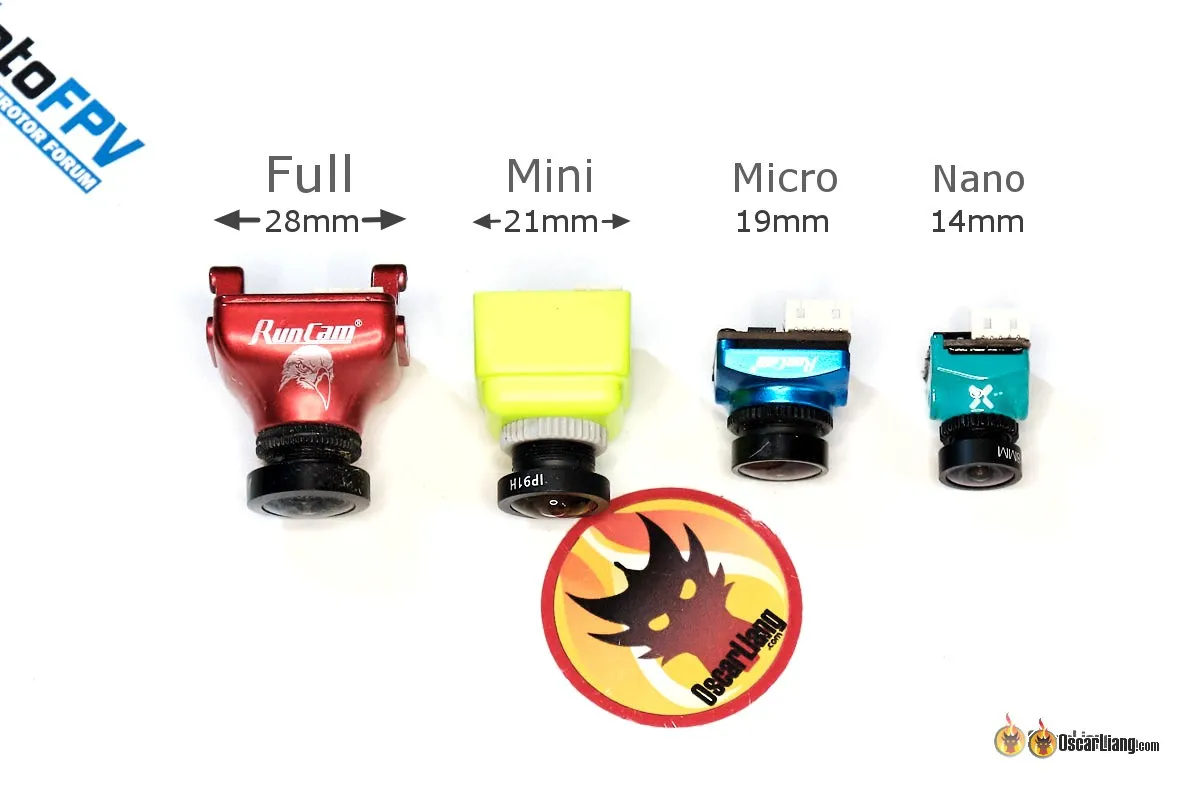
FPV digicam sizes are decided by the width, which is the space between the mounting holes on each side. Your selection of digicam measurement depends upon your FPV drone body and the way you intend to mount it. The frequent sizes embrace:
- Normal, aka “full measurement” (28mm)
- Mini (21mm)
- Micro (19mm)
- Nano (14mm)
Micro measurement is the preferred lately, because it sometimes works effectively with fashionable 3-inch, 4-inch, and 5-inch frames (and bigger). Drones which can be smaller typically use the Nano measurement. You’ll want to double-check the specs of your body to substantiate compatibility and keep away from surprises.
Facet Ratio

There are two facet ratios to select from in FPV cameras: 4:3 and 16:9.
4:3 is most popular for FPV flying as a result of it offers extra vertical FOV (subject of view), which is beneficial when your drone tilts ahead or backward whereas rushing up or slowing down. This lets you see what’s in entrance of you extra clearly. In distinction, 16:9 presents a wider view on the edges, however that info is much less helpful for pilots.
Moreover, if you happen to plan to stabilize your footage utilizing software program like Gyroflow, 4:3 has an edge over 16:9 as a result of it crops much less of the picture when rendering right into a 16:9 video for importing to platforms like YouTube.
Ideally, your FPV goggles ought to help the facet ratio of your FPV digicam. Mismatched facet ratios can lead to distorted photos within the goggles. As an illustration, you probably have a 4:3 digicam and 16:9 goggles, the picture will seem stretched.
Some FPV cameras permit you to change between 4:3 and 16:9 facet ratios. Nonetheless, when switching to a non-native facet ratio, you’ll expertise a lowered FOV resulting from cropping. It’s greatest to make use of the native facet ratio of the digicam for optimum efficiency.
Area of View
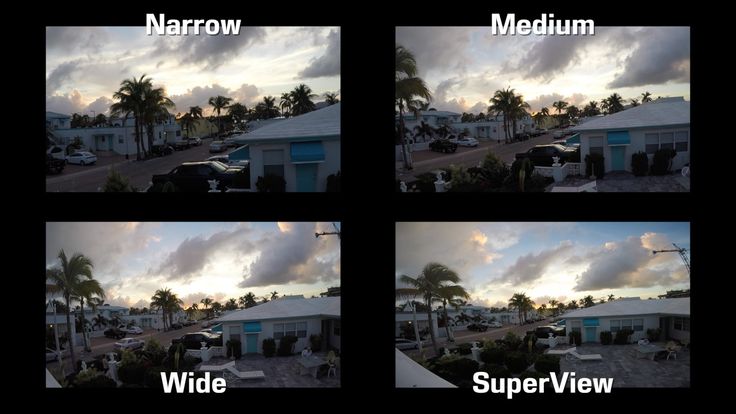
The sphere of view (FOV) of an FPV digicam determines the angle of the captured picture. A smaller FOV ends in a extra zoomed-in picture, permitting you to see obstacles like branches extra clearly. A wider FOV permits you to see extra of the setting, which may be most popular for proximity flying and racing.
Nonetheless, when the FOV is simply too giant, the picture seems distorted, leading to so referred to as “fish-eye” impact. Objects within the middle would seem smaller and additional away than they’re in actuality, whereas the sides of the picture seem curved and distorted.
There isn’t any “greatest” FOV, because it in the end depends upon private desire and the kind of setting wherein you fly.
FOV is affected by the lens’s focal size and the picture sensor measurement. A shorter focal size and a bigger sensor measurement lead to a wider FOV. Right here’s a tough estimation of FOV for a digicam with a 1/3″ sensor measurement in 4:3 facet ratio:
| Lens Focal Size | Approx. FOV |
| 1.8mm | 160° – 170° |
| 2.1mm | 150° – 160° |
| 2.3mm | 140° – 150° |
| 2.5mm | 130° – 140° |
| 2.8mm | 120° – 130° |
| 3.0mm | 110° – 120° |
As talked about beforehand, facet ratio may also have an effect on FOV if the digicam helps each 16:9 and 4:3. On this case, deciding on a non-native ratio will merely crop the edges or the highest and backside, leading to a smaller FOV.
Huge Dynamic Vary

The Huge Dynamic Vary (WDR) of an FPV digicam determines the picture high quality in excessive lighting situations the place each vibrant and darkish areas are current in the identical body. A superb digicam ought to ideally enable the pilot to see as a lot element within the shadows as doable whereas stopping the sky from being overly overexposed. Selecting an FPV digicam with first rate WDR functionality is essential, because it helps you see higher whereas flying, in the end serving to you keep away from obstacles and crashes.
Low Mild Efficiency

For those who plan to fly in low mild situations, resembling indoors or throughout sundown/night time, it’s important to decide on a digicam with good low mild capabilities.
Aside from checking opinions, you’ll be able to gauge a digicam’s low mild efficiency by its LUX quantity within the specs. The decrease the LUX worth, the higher the digicam’s low mild efficiency. Moreover, cameras with bigger imaging sensors typically carry out higher in low mild situations, as extra mild enters the sensor.
Latency
Latency refers back to the time it takes for the FPV digicam to seize, course of, and transmit the picture to the video transmitter. For drone racing fanatics or these partaking in high-speed flying, latency could be a essential consider deciding on an FPV digicam. Decrease latency permits pilots to react extra shortly, enabling higher management and avoiding potential obstacles or crashes.
Analog FPV Digital camera Concerns
CCD and CMOS

In analog FPV cameras, there are two frequent kinds of picture sensors used: CCD and CMOS, every with distinctive traits and benefits.
CCD is an older know-how and was the go-to picture sensor for FPV cameras because it carried out higher than CMOS on the time. Nonetheless, CMOS know-how has improved quickly, and it’s now simply nearly as good as CCD, if not higher. Fashionable analog FPV cameras virtually completely use CMOS sensors, that are frequently getting higher and extra reasonably priced.
For extra particulars, try this text in regards to the variations between CCD and CMOS: https://oscarliang.com/cmos-ccd-fpv-camera-multicopter/. Here’s a abstract of the professionals and cons of each kinds of sensor:
CCD:
- Much less jello impact in footage resulting from international shutter
- Much less picture processing and digital artifacts, nevertheless decision and picture element normally seem decrease than one of the best CMOS cameras
- Above common efficiency in low mild, dynamic vary and lightweight/darkish transition
- Higher picture distinction than CMOS
- CCD cameras carry out equally throughout the board, in contrast to CMOS cameras with various efficiency
CMOS:
- Extra vulnerable to jello resulting from rolling shutter
- Various efficiency and value: the most costly cameras are normally CMOS, and sarcastically, the most cost effective cameras are additionally CMOS, whereas CCD is usually within the mid-price vary
- Typically decrease in latency
- Larger decision and sharper picture, with the trade-off of doubtless over-sharpening and digital artifacts
- Low mild/night time FPV cameras have a tendency to make use of giant CMOS sensors
- Often extra versatile/dynamic with digicam settings
Picture Sensor Dimension

Along with CCD and CMOS varieties, picture sensors additionally come in several sizes. The 2 common sensor sizes for analog cameras are 1/1.8″ and 1/3″, with the previous being bigger and the latter being smaller.
Sensor measurement influences low mild efficiency and dynamic vary. Typically, a digicam with a bigger sensor can have higher low mild efficiency below the identical settings. Moreover, a bigger sensor offers a wider subject of view (FOV) when utilizing the identical focal size lens.
Digital camera Lens

You’ll be able to substitute the lens on an analog FPV digicam to attain a unique FOV or picture high quality. FPV digicam lenses primarily differ in two elements: focal size and thread measurement. For extra in-depth info, you’ll be able to confer with our article particularly about FPV digicam lenses.
Full-size cameras sometimes use bigger and heavier lenses with 12mm diameter thread that may be screwed into the housing, referred to as M12 lenses. Smaller 8mm lenses, or M8 lenses, are utilized to make cameras extra compact and light-weight. M12 lenses enable extra mild in, leading to marginally higher picture high quality in comparison with M8 lenses. M8 lenses are extremely compact and are principally utilized in Micro and Nano cameras.
NTSC and PAL

The principle distinction between NTSC and PAL lies of their decision and body price. PAL (720 x 576 @ 25fps) presents barely higher decision, whereas NTSC (720 x 480 @ 30fps) offers the next body price. For those who choose higher image high quality, select PAL; in order for you smoother footage, go for NTSC. For a extra detailed comparability, try this put up.
Historically, NTSC is utilized in North America, Japan, and South Korea, whereas PAL is employed in most of Europe, Australia, and huge elements of Africa and Asia. It may be a good suggestion to stick to the usual in your nation. Nonetheless, that is much less of a priority these days, as each video codecs are absolutely supported by all FPV gear.
Keep in mind to pick the suitable format your digicam makes use of in Betaflight OSD to make sure that the textual content is displayed appropriately.
TVL
TVL, or “TV strains,” is the time period utilized by producers to measure the decision of analog FPV cameras.
TVL is measured by connecting the digicam to a show and having it seize a picture of a card with alternating black and white strains. The utmost variety of distinct black and white strains that the digicam can detect is its TVL worth, which represents the picture element the digicam is able to producing.
Nonetheless, TVL has turn out to be much less significant in recent times, as producers usually inflate these numbers as a advertising software. As an alternative of counting on TVL, select your digicam primarily based on the picture high quality demonstrated in opinions.
Easy methods to Join an Analog FPV Digital camera to a VTX?

Wiring an analog FPV digicam in your drone varies relying on the applying and parts concerned. At its most simple, an FPV digicam has three wires to attach: video sign, energy, and floor.
To attach the FPV digicam on to a VTX, join the sign wires, and guarantee you could have a working video receiver on the identical channel in your FPV goggles to get a picture. Additionally, join the bottom wires of each the FPV digicam and VTX if they’re powered from totally different sources.
Fashionable FPV cameras help a variety of enter voltage (e.g., 5V to 36V), permitting you to energy them from a regulated 5V BEC or immediately from a LiPo battery (2S-8S).
Take into account these good practices when connecting your FPV setup for cleaner video: https://oscarliang.com/connect-vtx-fpv-camera/
Utilizing the flight controller (FC) with a built-in OSD chip is the most typical option to join an FPV digicam. Join the digicam sign to the video enter on the FC, and join the video output on the FC to the VTX.

Some optionally available connections could also be obtainable relying on the digicam’s options, resembling:
- TX and RX (UART) for connecting to the FC, permitting digicam settings to be modified utilizing your radio
- OSD or Menu pins for connecting a joystick for altering digicam settings
- VBAT or VSEN for monitoring battery voltage
Recording Flight Footage
There are a number of methods to report flight footage out of your FPV digicam:
- FPV Goggles with DVR: Most FPV goggles have a built-in DVR (digital video recorder) that data no matter is displayed on the display, even together with the sign break-ups.
- VTX with Onboard Recording: Some video transmitters (VTX) characteristic onboard recording capabilities, which ship increased high quality footage in comparison with DVR recordings in goggles. They don’t embrace sign break-ups skilled throughout flight. Examples of such VTXs embrace the DJI O3 Air Unit and the Walksnail Avatar VTX.
- Exterior DVR for Analog: For analog setups, you need to use an exterior DVR related on to the FPV digicam contained in the drone. This technique data footage with none interference and customarily presents higher picture high quality since there’s no high quality loss from the 5.8GHz wi-fi hyperlink.
For the very best picture high quality, think about mounting an motion digicam, resembling a GoPro, in your drone. This selection captures high-quality footage that can be utilized for numerous functions, together with sharing on-line or analyzing flight efficiency.
Can I exploit HD cameras as FPV cameras?
Whereas it’s true that many gorgeous HD FPV movies on YouTube are captured utilizing HD motion cameras resembling GoPro or Runcam 3, these cameras are typically not appropriate for real-time FPV flying.
Some HD cameras provide “video out” capabilities, permitting them to be related to an video transmitter for FPV. Nonetheless, the latency in these cameras is usually too excessive for FPV flying (usually over 100ms), making it difficult to react in time to stop crashes. Consequently, it’s advisable to make use of a devoted FPV digicam for real-time flying and.
Easy methods to Setup OSD

OSD (on-screen show) is a characteristic that overlays helpful flight info onto your FPV goggles throughout flight. Relying in your particular FPV system, the method for organising OSD might range. Under are tutorials for numerous techniques:
These tutorials will information you thru the required steps to configure OSD for every system and assist guarantee that you’ve got entry to invaluable flight info throughout your FPV flying expertise.
You made it!
Congratulations on reaching the tip of this complete FPV digicam information! I sincerely hope that the knowledge offered has been useful in your quest to seek out the proper FPV digicam on your wants. In case you have any questions or feedback, please don’t hesitate to succeed in out. Completely satisfied flying!
Edit Historical past
- 2014 – Article created
- 2016 – Up to date data about CMOS vs. CCD, Added data about OSD and digicam measurement
- 2018 – Added data about digicam management and low mild functionality
- 2019 – Added a little bit historical past about digicam improvement, Up to date data relating to FOV, lens sizes, sensor sizes, CCD/CMOS, Constructed-in Mic, DVR, and connection
- 2023 – Added FPV digicam suggestions for all obtainable FPV techniques, DJI, HDZero, Walksnail and analog. Revisited the information, shortened URL.
- Could 2024 – Up to date merchandise