Should you’re seeking to get essentially the most out of your Radiomaster Boxer, you’re in the suitable place! This text will take you thru establishing the EdgeTX geared up Radiomaster Boxer out of the field, ideas and methods, offering you with a complete, easy-to-follow information to make your FPV flying expertise extra gratifying.


Take a look at my evaluate of the Radiomaster Boxer: https://oscarliang.com/radiomaster-boxer/
Putting in Antenna
Be sure that the included antenna is hooked up earlier than powering on the radio. Powering on the radio with out the antenna could cause the RF chip to overheat rapidly and even turn out to be broken.
Putting in Battery
You will have two 18650 Li-ion cells (unprotected) which aren’t included. Merely insert them within the battery holder and plug it in to the radio within the battery compartment. I examined a bunch of 18650 cells and located these to be the very best choices for radios:
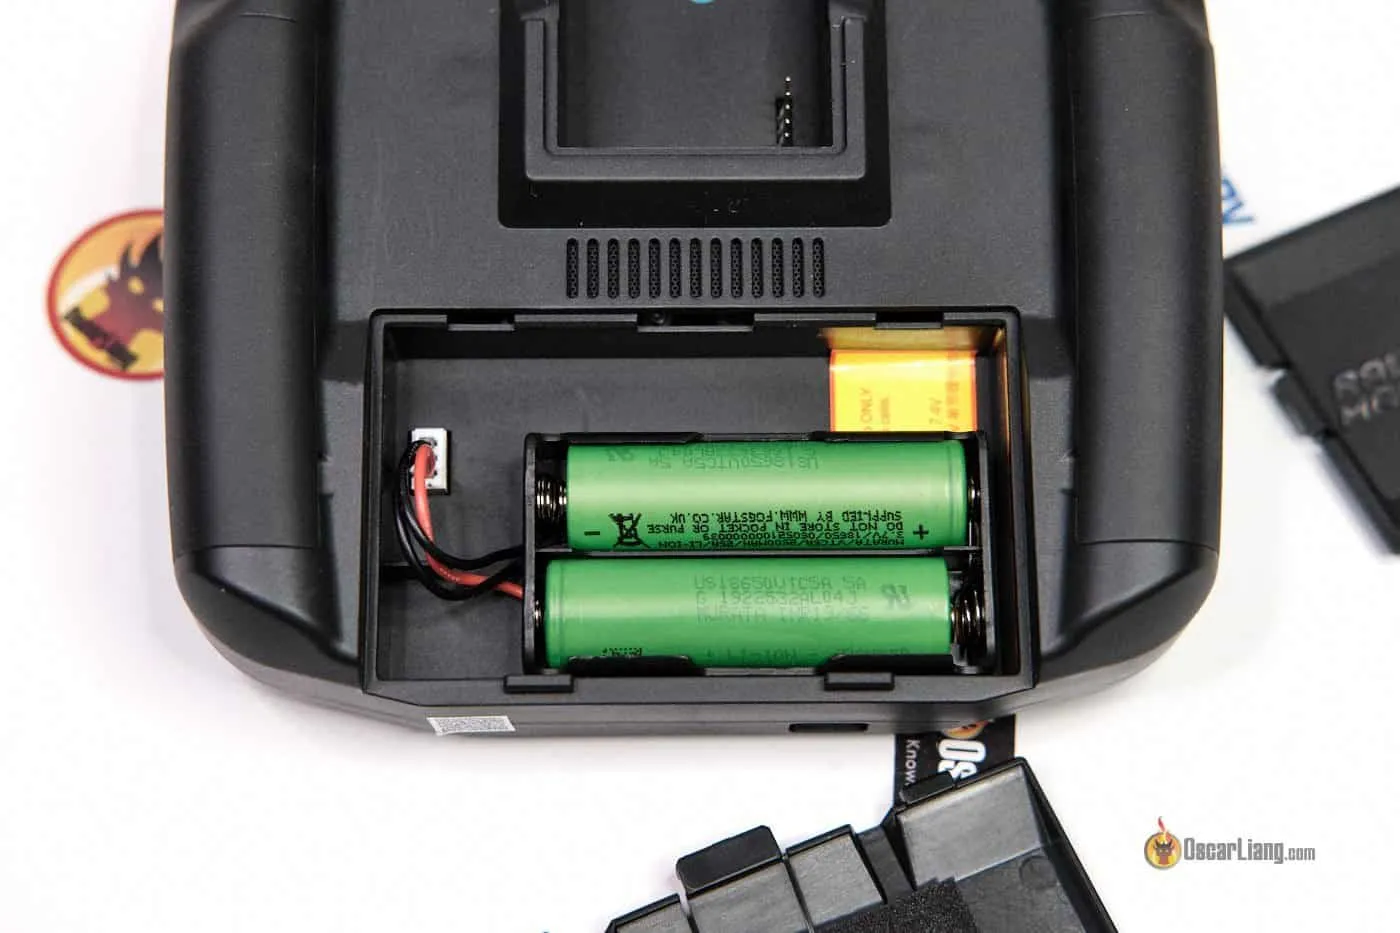
Panasonic NCR18650B 3400mAh:
Molicel P26A/P28A 18650:
Sony VTC6 18650:
Alternatively you can even use a 2S LiPo battery, for instance this massive capability battery pack from Radiomaster designed particularly for the Boxer: 2S 6200mAh Pack

Potential Begin-up Warning Defined
To activate the radio, maintain down the facility button for 3 seconds.
A model new radio shouldn’t offer you any warning once you first flip it on, however in case you do, right here’s a listing of potential warnings and what they imply.
- Throttle Warning – your throttle stick will not be on the lowest place when the radio is turned on. Merely transfer the throttle stick (left one) all the way in which down will eliminate this warning
- Change Warning (aka Management Warning) – a number of the switches will not be of their default positions. Merely put all of the switches to their UP place (push away from you) to take away this warning
- Alarms Warning – This warning will seem if Sound mode is about to mute
- SD Card Warning – SD card content material model doesn’t match the firmware model. Should you get this warning, observe this information to repair it
If every part goes effectively, you need to get to the default dwelling web page, which ought to look one thing like this.

Radio Settings
In Radio Settings, you’ll discover choices for establishing your radio’s show and audio and so on. To configure radio settings, maintain down the SYS button, it is going to take you to the TOOLS web page. Press the PAGE> button twice to scroll to Radio Setup web page. Listed below are the settings you may need to change for the primary time.
Set Date & Time.
Battery Vary:
- Li-ion battery: 6.4V – 8.2V
- Lipo battery: 7.4V – 8.2V
Battery Vary impacts the battery indicator on display screen, at what voltage it exhibits empty and full. Why setting minimal voltage to six.4V since a 2S Li-ion battery will be discharged to decrease voltage you could ask? Nicely, you’ll be able to actually set it decrease e.g. at 6.0V, however somewhat greater voltage provides you earlier visible warning.
And why setting max voltage to eight.2V, and never 8.4V? As a result of as quickly as you energy on the radio, it attracts present from the battery which causes voltage sag, principally you’ll by no means see 8.4V on the display screen, and we are able to deal with 8.2V as a full battery.
Alarms:
-
- Battery low
- Inactivity => 10m (if the radio is untouched for 10 minutes, it begins shouting “inactivity alarm”)
That is the battery voltage restrict when the radio begins shouting “voltage low”. Should you fly lengthy vary you may need to set this greater so you might have sufficient battery to make your means dwelling.
Backlight
-
- Mode => Keys
- Period => 15s (backlight stays lit for 15 seconds)
- OFF brightness set to lowest to save lots of battery
- Alarm => Enabled (backlight activates when there’s a warning on the radio)
Backlight -> Mode: Keys
Why Key Mode? By default each sticks and buttons will set off the backlight, which is pointless and waste battery in my view. By altering it to Keys, solely the menu buttons would activate backlight, sticks and switches received’t, this protects battery as you don’t want backlight whereas flying. If you find yourself flying you aren’t actually watching the display screen so permitting solely the keys (menu buttons) to set off backlight is extra smart
Distinction (backlight brightness): 17
Why? I discovered greater distinction than this leaves “black ink” on the background when display screen adjustments
Pwr Off delay: the time it takes to carry down the facility button to modify off the radio, that is principally a security characteristic to keep away from unintentionally turning the radio off. I personally set it to 1s for sooner shut down, however if you wish to play protected simply depart it at default (2s).
Pwr On delay: quickest potential.
Lastly, scroll to the {Hardware} web page by urgent the PAGE>, scroll right down to Int. Module. You probably have inside ELRS module, set it to CRSF. You probably have the inner multiprotocol module, set this to Multi. That is often set appropriately out of the field, however simply in case you need to double verify.
Different non-obligatory settings:
- USB mode: set it to ASK.
- Sound Settings (together with quantity, beep size, pitch, wave quantity, background music quantity, and vario settings): set Sound to “All” so that you get the “beeps” when scrolling.
- Haptic Suggestions (modify power and size of vibration suggestions): I take advantage of decrease haptic power and size, as a result of the default was a bit too sturdy.
- Backlight (totally different modes, length, brightness, alarm)
- Splash Display screen (energy on/off delay)
- Every of those subsections permits you to customise your Radiomaster Boxer to your private preferences, making certain an optimum flying expertise.
IMPORTANT: Go to the {Hardware} web page in System setup, and switch off ADC Filter!
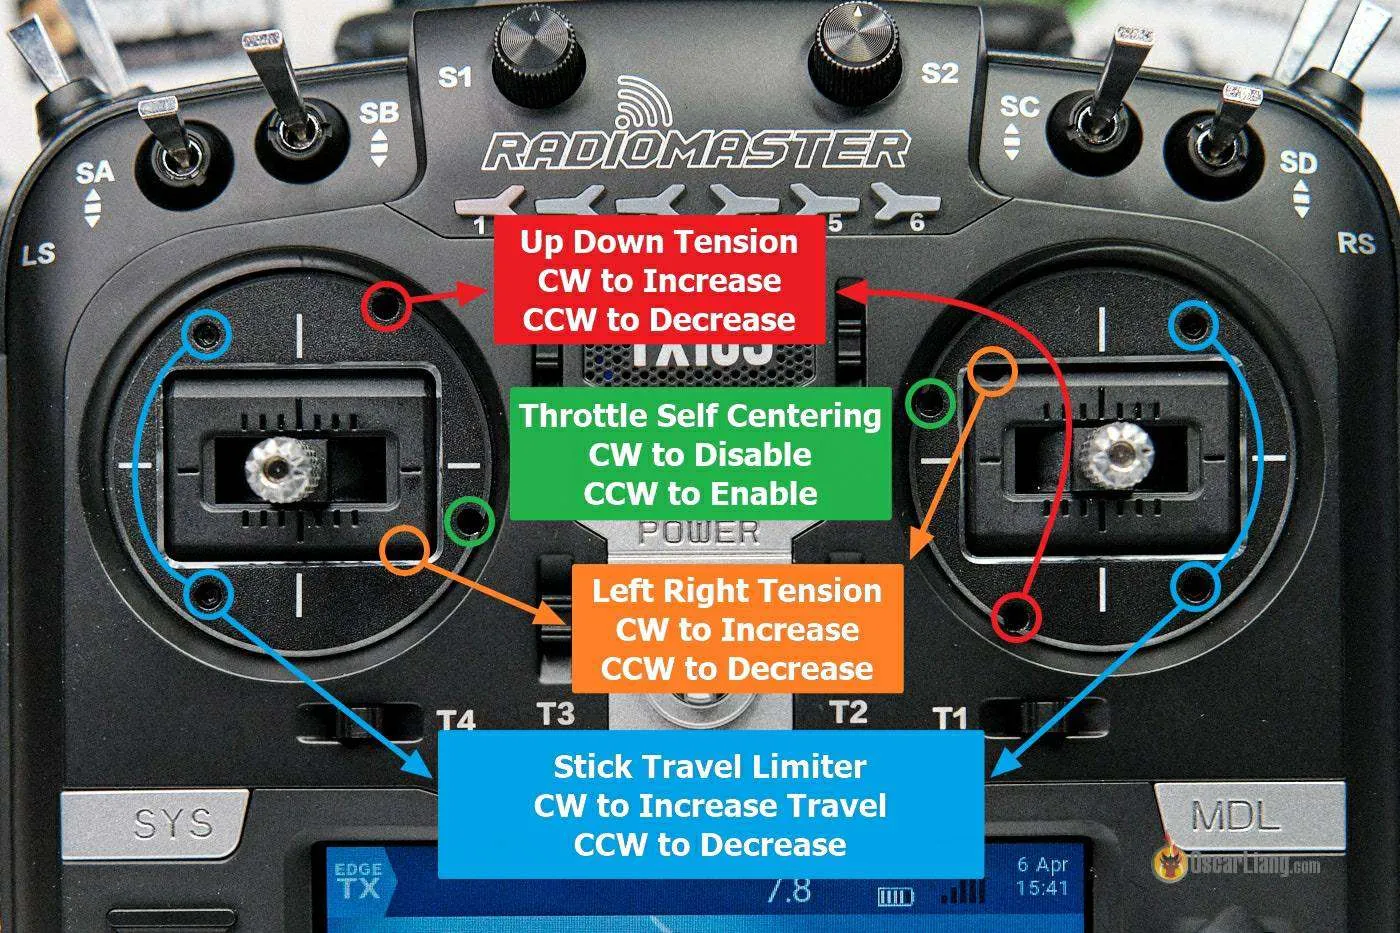
Gimbal Calibration
If the sticks are too stiff or too unfastened, you’ll be able to modify the gimbal spring pressure. You in all probability need to do that first earlier than calibrating the gimbals.
Adjusting gimbal pressure could be very handy with the Boxer, you are able to do that from the entrance with out tearing down the radio.
It’s best to calibrate the gimbals earlier than utilizing it. You may also need to do that after flashing EdgeTX/OpenTX firmware.
Go to Radio Setup web page once more, then press “PAGE” button a couple of instances to go to “HARDWARE” web page, choose “Calibration” choice to calibrate the sticks and sliders. Simply observe the instruction, it’s fairly straight ahead
Be sure to solely transfer the sticks as proven within the following picture. For finest end result, keep away from transferring the sticks in circle. Be as light as potential when pushing the sticks, so the radio reads the top factors appropriately.

Be sure to additionally transfer the sliders and rotary switches. You additionally must calibrate the 6 flight mode buttons, they’re truly handled as a slider within the radio. In case your flight mode buttons will not be working, likelihood is you haven’t calibrated them but.
Battery Voltage Calibration
To make sure correct battery voltage studying, you need to calibrate the radio’s battery voltage.
Measure the voltage of the Li-ion battery contained in the radio utilizing a digital multimeter. As a result of the cells are related in collection, it ought to learn someplace between 6V to eight.4V. The purpose is to ensure the voltage is identical between the measurement and the worth proven within the radio.
Should you don’t have a multimeter, you can even do that with a voltage checker. Nonetheless, this doesn’t consider the voltage drop when the radio is working, which results in inaccurate studying. The distinction will be vital particularly in case you are transmitting at a excessive output energy, voltage can drop as much as 0.5V or extra.

To calibrate voltage, go to the “{Hardware}” web page, scroll right down to Battery Calibration and confirm if the readings are the identical. You’ll be able to modify it utilizing the wheel button.

Mannequin Profile
The Boxer comes with a couple of mannequin profiles pre-created for you out of the field, you should utilize considered one of them relying on what sort of mannequin you intent to fly. To see what fashions profiles can be found, you’ll be able to go there by holding down the MDL button.
For FPV drones, you’ll be able to simply use the “Boxer” profile, it has already enabled the inner RF module (ExpressLRS), and assigned all of the controls and switches to the suitable channels in MIXES. All that’s left to do now could be to bind the receiver within the drone to the radio.
This information explains the right way to bind ExpressLRS receiver to a transmitter: https://oscarliang.com/bind-expresslrs-receivers/
You probably have the multiprotocol model (i.e. 4in1 or CC2500), you’ll be able to observe this part on the right way to setup the inner module to your desired protocol: https://oscarliang.com/setup-tx16s-t16-radio/#model-settings
Making a Profile for FPV Sims
Should you plan to play FPV simulator with this radio, I’d suggest making a devoted mannequin profile with each inside and exterior RF module turned off.
To do that, merely copy the Boxer profile, and make a replica profile. Then set each inside RF and exterior RF to off in mannequin settings.
Backup and Restore Radio
I like to recommend backing up your radio settings frequently (e.g. earlier than firmware updates and everytime you make huge adjustments). EdgeTX has made it very easy to take action.
Radio settings are all saved in a single file referred to as radio.yml, it’s positioned within the RADIO folder on the SD card. Fashions Profiles are all saved within the MODELS folder on the SD card.
Observe directions right here to backup and restore your radio SD Card Content material: https://oscarliang.com/backup-restore-models-radio-settings-edgetx/
Quantity and Backlight Controls

World features allow you to arrange extra options, akin to controlling the amount and backlight brightness with a potentiometer on the radio. One nice use of World perform is to make use of the potentiometers (S1 or S2) for adjusting radio sound quantity and display screen backlight brightness. That is the right way to do it:
Go to Radio Setup Web page once more, then press “PAGE” button a couple of instances to go to “World perform” web page, and assign quantity management to a knob. It’s also possible to do it beneath mannequin setup, particular perform, however I want doing this in World perform so it really works on all fashions. Repeat this for Backlight brightness.
Updating EdgeTX
Step one within the improve course of is checking the model data within the system menu (Radio settings => Variations). My Boxer was shipped with EdgeTX 2.8.0. The improve course of makes use of the web flashing device, EdgeTX Buddy, which is the only option to replace EdgeTX firmware.
It’s possible you’ll need to preserve your radio’s EdgeTX firmware updated for bug fixes and new options. You’ll be able to observe this information to flash and replace EdgeTX: https://oscarliang.com/flash-edgetx/.
Should you mess any factor up, don’t fear, the inventory EdgeTX firmware file for the Boxer is within the FIRMWARE folder, you’ll be able to re-flash the radio with this file and it’ll deliver it again to its unique state.
Updating Inner ExpressLRS Module
For the ExpressLRS (ELRS) model, the steps for updating the inner module are the identical because the Zorro, which entails utilizing ExpressLRS Configurator software program: https://oscarliang.com/update-zorro-elrs-firmware/, however you need to choose a unique Machine earlier than flashing, on this case it could be the Radiomaster Boxer.
To summarize the steps:
- Use the highest USB-C port on the Boxer for knowledge switch and choose “USB Serials (VCP)”.
- Within the configurator, select the most recent firmware model, Radiomaster because the machine class, and Boxer because the machine.
- Choose EdgeTXPassthrough as your flashing technique.
- Configure your regulatory area (ISM_2400 for FCC) and enter your binding phrase and Wi-Fi particulars.
- If flashing through USB, click on “Construct & Flash”. If flashing through Wi-Fi, click on “Construct” and observe the Wi-Fi flashing steps.
You probably have the multiprotocol module (4in1 or CC2500), then it is advisable to observe these directions to replace it: https://oscarliang.com/flash-edgetx/#update-internal-multi-protocol-module
Improve Gimbals

The Boxer is completely suitable with the AG01 gimbals, it’s a direct swap.
The unique Corridor gimbals within the Boxer are fairly respectable, nevertheless, the improve to the CNC AG01 gimbals has been an absolute game-changer for me. The AG01 gimbals deliver a strong, clean, and extra exact really feel that plastic gimbals can’t present, particularly on the extremes of stick motion. However let me make clear – the unique Corridor gimbals had been removed from disappointing; it’s simply that the CNC AG01 gimbals deliver a sure solidity and sturdiness that could be very interesting.
You’ll be able to improve to the premium totally CNC metallic AG01 Gimbals if you want with out doing any customized mod, it’s a direct swap. Purchase them right here:
Putting in these gimbals is a simple course of. You begin by eradicating the unique gimbals. There are solely 4 screws on the corners of every gimbals.

Then set up the AG01 gimbals.

Ensure to re-calibrate the gimbals within the {Hardware} web page as soon as it’s finished.
Ideas and Tips
Stickend Improve

The Boxer gimbals help “M4 threaded stick ends”. My present favorite stick ends for the Boxer are these Sticky360, get the M4 model: https://oscarliang.com/radiomaster-sticky360-stickends/
Customized Sound Pack
You’ll be able to obtain customized sound pack and exchange the unique one. My favorite is Amber sound pack, the sound high quality is best than the unique.
Obtain right here: http://open-txu.org/dwelling/version-2/v2-2-resources-2/
Unzip and exchange the information within the SOUND/en folder on the SD card.
Enjoying Customized Sounds
You’ll be able to play customized sound information in your Boxer. I’ve a tutorial on the right way to create customized sound file for OpenTX radios (similar method applies to EdgeTX). You’ll be able to even play your favorite songs.
Ensure the filename doesn’t exceed 6 characters, and the file extension doesn’t exceed 3 characters, or the file received’t seem. And keep away from symbols within the filename.
File format required: 32000khz Mono Wav
Switches Covers

Radiomaster presents these silicone change covers with labels. No extra confusion on what your switches do.
Product Hyperlinks:
Exploring the Instruments Web page

The Instruments web page in your Radiomaster Boxer is a group of helpful LUA scripts. The LUA script that you’ll use essentially the most would in all probability be ExpressLRS, which lets you configure your ExpressLRS module.
Changing Inner Button Cell Battery

In case your radio stops saving settings akin to date and time, you in all probability want to exchange the button cell battery contained in the radio. You should purchase this fairly cheaply on-line.
Lithium 3V CR1220, Amazon (affiliate hyperlink): https://amzn.to/3yDyDBe
Conclusion
We hope this complete information has been useful in establishing your Radiomaster Boxer ExpressLRS. By following these easy-to-follow steps, you can be effectively in your option to customise your radio to satisfy your distinctive preferences.